)
A Kolla-Ansible multinode deployment refers to the process of deploying OpenStack services across
multiple physical or virtual nodes using Kolla-Ansible, an Ansible-based deployment tool for OpenS-
tack. This approach allows for the distribution of various OpenStack components (such as Compute,
Networking, and Storage) across different nodes, enhancing scalability, redundancy, and performance.
This multinode approach is essential for production environments where high availability, redun-
dancy, and performance are critical. It also provides a flexible and modular way to manage complex
OpenStack environments.
Kolla-Ansible multinode deployment Architecture
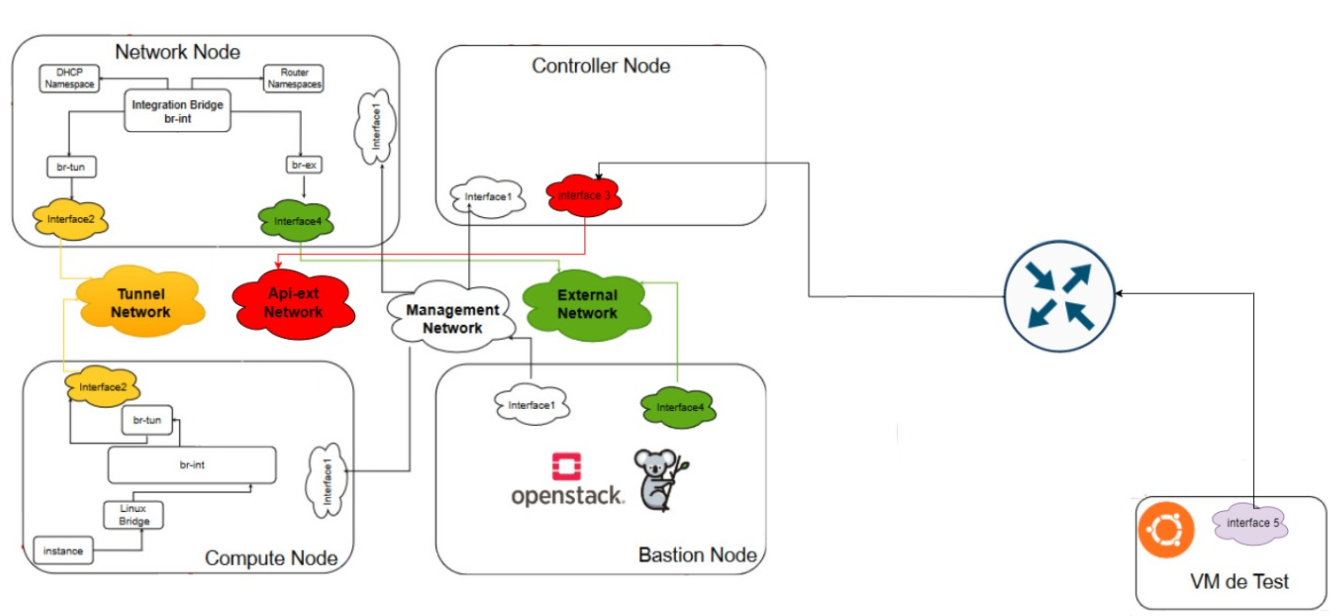
Our architecture consists of four nodes :
1- Controller Node : IManages the coreOpenStack services, such as the API, identity management (Keystone), the database, the dashboard (Horizon), volume management (Cinder), and image management (Glance), among others.
2- Network Node : Dedicated to managing network services, including routing, security, and network access. It hosts the Neutron services.
3- Compute Node : Responsible for running instances.
4- Bastion Node : Kolla-Ansible is installed and configured here to orchestrate the deployment of all OpenStack services across the other nodes.
Types of networks :
1- Management Network is used for internal communication between the components of the OpenStack infrastructure. It enables OpenStack services and components to communicate with each other in a secure and efficient manner.
2- External Network provides connectivity to external networks such as the Internet. These networks enable instances within the OpenStack cloud to communicate with the outside world. External networks are managed exclusively by administrative (privileged) users because they directly interact with the underlying physical network infrastructure. External networks can use flat or VLAN transport methods depending on the physical network infrastructure and typically utilize public IP address ranges.
3- Tunnel Network is a virtual network infrastructure that uses tunneling protocols like VXLAN or GRE to encapsulate and transmit data packets between compute nodes and network nodes. This network isolates the network traffic of different tenants and ensures secure communication between instances.
4- API-Ext Network refers to the network that facilitates communication between the OpenStack Controller Node and external clients or systems, such as a test node or end-user devices. This network typically exposes the OpenStack API endpoints to the outside world, allowing users and services to interact with OpenStack components like Keystone (Identity service), Nova (Compute service), Neutron (Networking service), and others.
Steps for Multinode Deployment : Hands-On
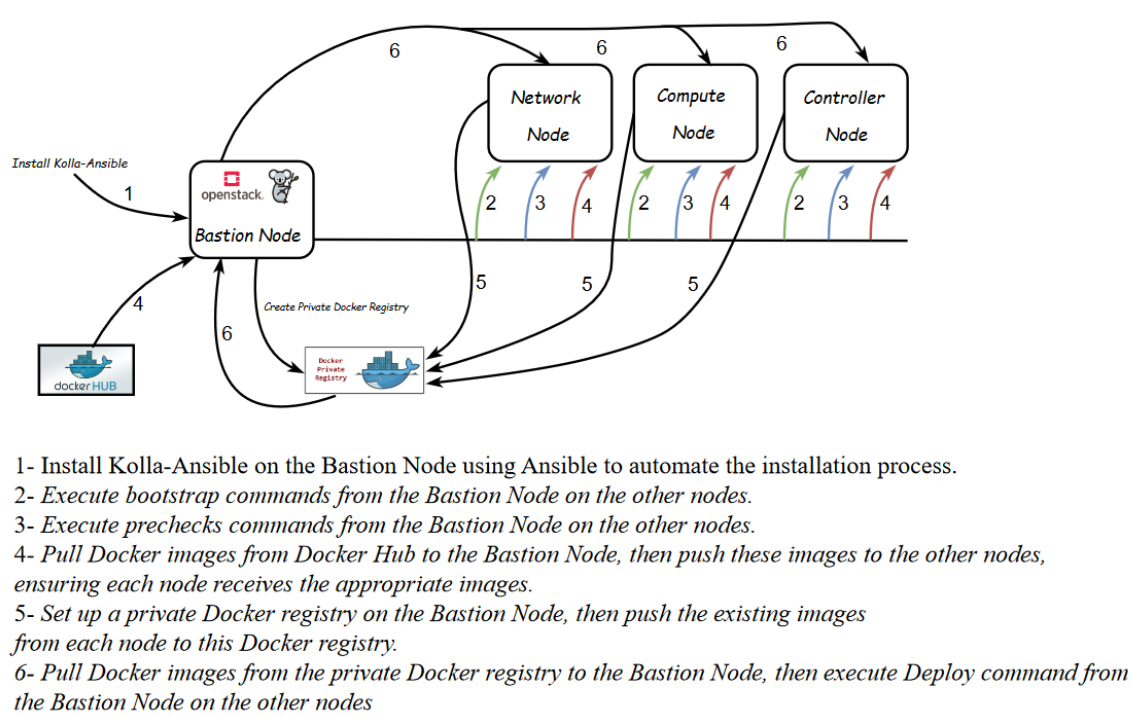
Install Kolla-Ansible on the Bastion Node using Ansible.
In our architecture, we use the Bastion Node as the deployment node from which all OpenStack services can be deployed to the other nodes. To automate this installation, we use Ansible as the configuration management tool.
To automate this installation, we prepared an Ansible playbook and pushed it to a GitLab repository.
Here is the GitLab repository that contains the Ansible playbooks for installing Kolla-Ansible on the Bastion Node.
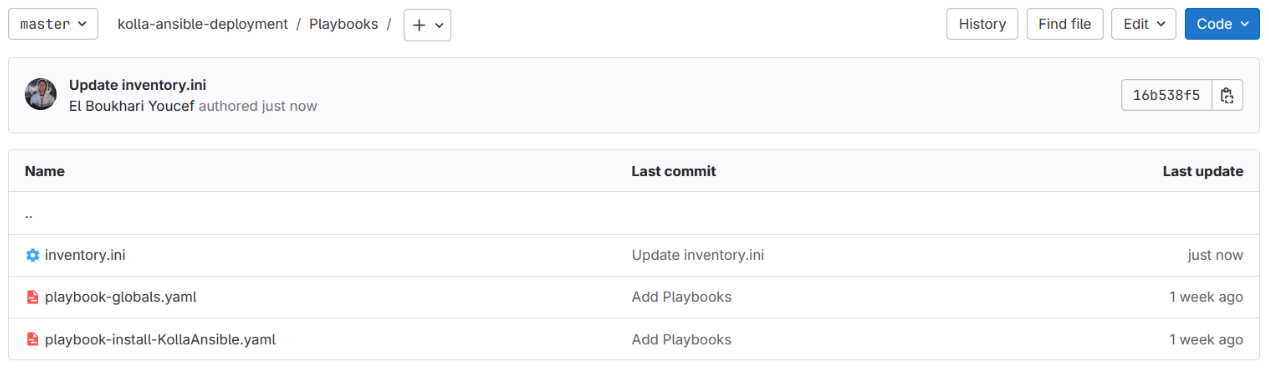
So, to install Kolla-Ansible on a node, we simply need to execute these playbooks.
Note : The commands in this section are the same as those in the last section (all-in-one deployment), but this time they are automated with Ansible. here is the link : https://superuser.openinfra.org/articles/ho to implement-an-openstack-based-private-cloud-with-kolla-ansible-part-1/
Explanation of the various modifications made in globals.yaml and the multinode file.
1- global.yml
“globals.yml” is the main configuration file for Kolla Ansible and per default stored in /etc/kolla/-
globals.yml file. There are a few options that are required to deploy Kolla Ansible :
First of all we should specify image that are going to be used for our deployment, in our case we choose
Ubuntu (ubuntu).
We will use in “kolla-internal-vip-adress” the @IP of controller-node attached with management network + 1 bits but before the last command of deploy we will replace it with @IP of controller-node attached with management-network
After that we will use in network-interface the @IP of network-node attached with management-network
Let’s add these interfaces, ’api-interface’ that handles management and control traffic (APIs) and ’tunnel interface’ that handles internal tenant network traffic (such as VMs communicating with each other across different compute nodes).
We will use in neutron-external-interface the @IP of network-node attached with external-network.
Let’s enable haproxy (HAProxy is a high-performance, open-source software that provides load balancing, proxying, and high availability for TCP and HTTP-based applications.) and also enble cinder (storage).
All these modifications in globals.yml are automated with this playbook-globals.yml.
Visit this link for the content of this playbook : https://gitlab.com/groupeinpt/multinode-deployment openstack-kolla-ansible/-/blob/main/playbooks/paybooks-for-bastion/playbook-globals.yaml?ref_type=heads
2- multinode file
The multinode file is an inventory file in Ansible. It defines the list of hosts (nodes) in your OpenStack deployment and organizes them into groups based on their roles (e.g., controller, compute, network).
The group-vars directory in Ansible is used to define variables that apply to all hosts within a particular group. These variables are often used to configure settings that should be consistent across all nodes in a specific role.
The host-vars directory in Ansible is used to define variables that apply to individual hosts. These variables are specific to a particular node and override any group-level variables if both are defined.

- Controller :
Let’s see first our configuration of network in controller node according to the output of the command ip a :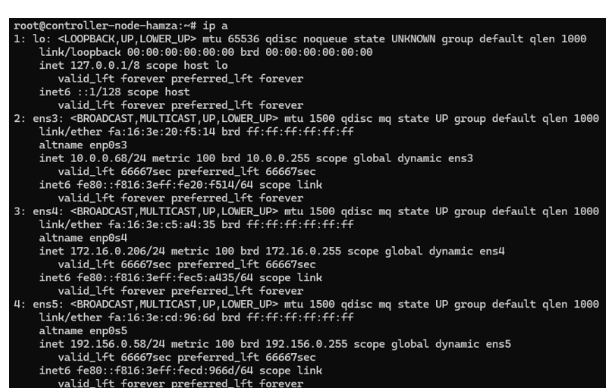
In multinode file we add this :

In control file inside group-vars directory we add this :
In control01 file inside host-vars directory we add this :

We repeat the same thing for the other three nodes.
Hands-on steps for bootstrapping, prechecks, and pulling commands.
After configuration is set, we can proceed to the deployment phase. First we need to setup basic host-level dependencies, like docker.
Kolla Ansible provides a playbook that will install all required services in the correct versions.
The following assumes the use of the multinode inventory.
1- Bootstrap servers with kolla deploy dependencies :
In the context of a multinode Kolla Ansible deployment with three nodes—compute, controller, and network—the step “Bootstrap servers with kolla deploy dependencies” involves preparing each node by installing the necessary dependencies for Kolla Ansible to function properly. This preparation includes installing essential software packages, configuring the system environment, managing users and permissions, and ensuring all required packages for deploying OpenStack containers are in place.
This step ensures that each node is ready to host OpenStack services, orchestrated by Kolla Ansible, by setting up the prerequisites before proceeding with the deployment of OpenStack containers on these nodes.
$ kolla−ansible −i . /multinode bootstrap−servers
Do pre-deployment checks for hosts :
The ‘prechecks‘ command in the context of a multinode Kolla Ansible deployment involving three nodes—compute, controller, and network—plays a crucial role in ensuring that the environment is properly prepared for a successful OpenStack deployment. This command performs a series of validation checks across all the nodes to verify that the system meets the required criteria. It checks for adequate system resources, correct network configurations, appropriate software versions, and other dependencies that are critical for the deployment process. Running ‘prechecks‘ helps identify and resolve any potential issues in advance, reducing the risk of encountering errors during the actual deployment phase, thereby facilitating a smoother and more reliable installation of OpenStack across the compute, controller, and network nodes.
$ kolla−ansible −i ./multinode prechecks
Pre-deployment Image Preparation with the ‘kolla-ansible pull‘ Command :
The ‘pull‘ command in the context of a multinode Kolla Ansible deployment is used to fetch the necessary Docker container images onto each node in the deployment—compute, controller, and network nodes. This command ensures that all nodes have the required images for OpenStack services before the actual deployment begins. By pulling the images ahead of time, the deployment process becomes more efficient, as it avoids delays that could occur if images were pulled during service startup.
In a multinode setup, running the ‘kolla-ansible pull‘ command ensures consistency across nodes, helping to prevent issues related to image mismatches or version conflicts.
$ kolla−ansible −i ./multinode pull
Set up a private Docker registry on the bastion node.
We already automate the commands that we should execute in bastion-node in this playbook exist in this link : https://gitlab.com/groupeinpt/multinode-deployment-openstack-kolla-ansible/-/blob/main/playbooks/paybooks-for-bastion/playbook-docker.yaml?ref_type=heads
This Ansible playbook is designed to automate the setup and configuration of Docker on a local machine, ensuring that Docker is installed, the Docker service is enabled and running, and a Docker registry container is deployed.
It begins by installing the Docker package using the apt package manager, ensuring the package is up-to-date :
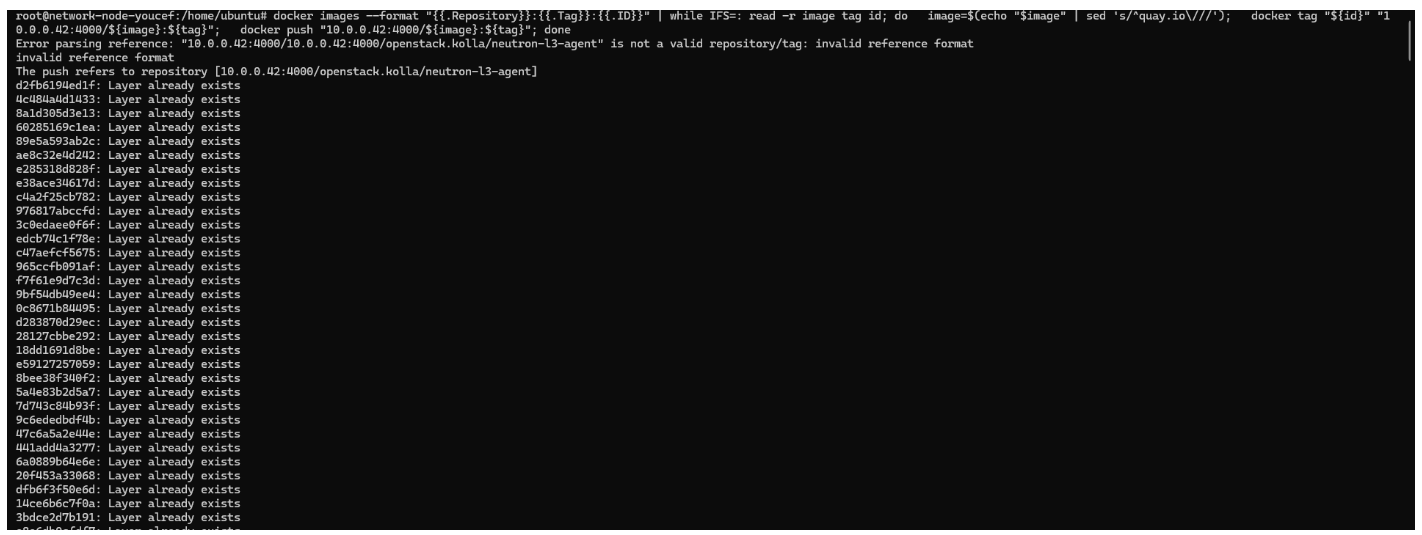
Push Docker images from the other nodes to the private Docker registry
After pulling the required Docker images from the Bastion Node to the compute, controller, and network nodes, the next step is to push these images to the private Docker registry hosted on the Bastion Node. This process ensures that all nodes in the multinode Kolla Ansible deployment have access to a centralized and consistent set of Docker images. By pushing the images to the private registry, the deployment is optimized for faster and more reliable access to the necessary images, reducing the dependency on external repositories during the deployment and future updates.On each node, a command is executed to perform this pushing.
Hands-on steps for pulling and deploying commands from Bastion Node to the other nodes
This process involves using the bastion node as a central point for managing and deploying Docker containers across a network of servers(3 other nodes). First, the required Docker images are pulled from a private Docker registry, which is a secure, internal repository for storing Docker images, to the bastion node. Once these images are available on the bastion node, deployment commands are executed from it, targeting other nodes in the network. The bastion node orchestrates the deployment, ensuring that the Docker containers are correctly set up and running on the designated servers, allowing for a controlled and secure deployment process across the infrastructure.
As we say before we will execute first the pull command :
$ kolla−ansible −i ./multinode pull
We see that our deploy command is passed correctly :
Create a Cinder volume on each node using Ansible
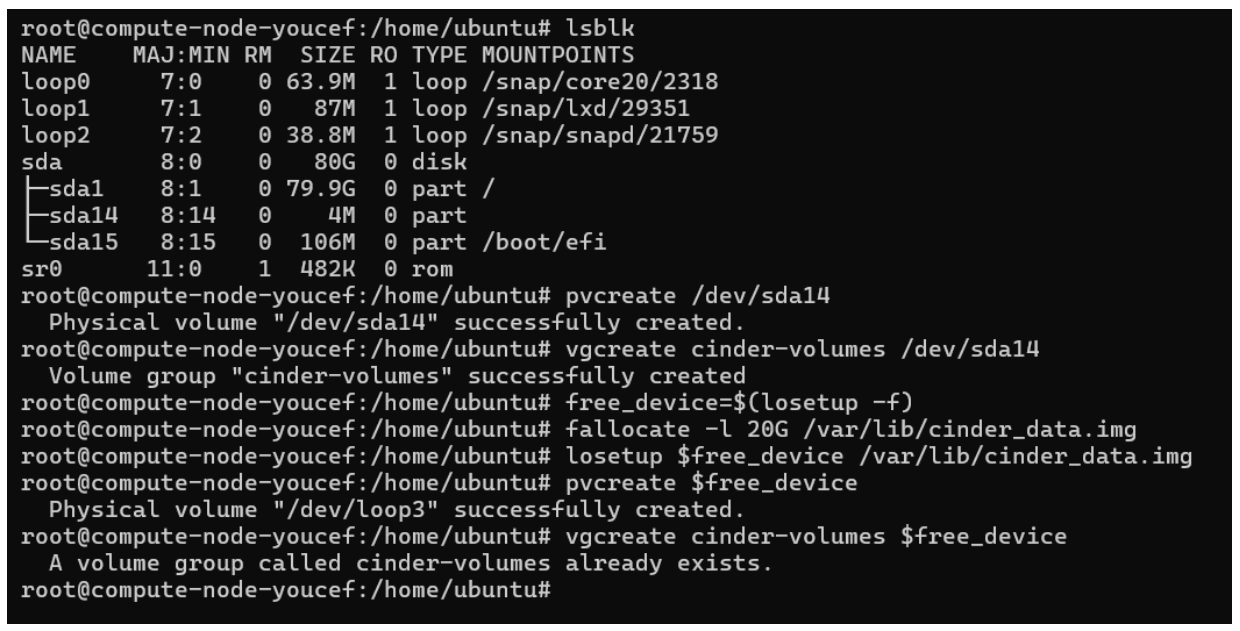
Cinder can be deployed using Kolla and supports the following storage backends : ceph ,iscsi ,lvm,nfs When using the lvm backend, a volume group should be created on each storage node. This can either be a real physical volume or a loopback mounted file for development. Use pvcreate and vgcreate to create the volume group. For example with the devices /dev/sda14
To create a Cinder volume on a storage node, several commands need to be executed. Since these commands will be repeated across multiple nodes, we have decided to automate the process using Ansible.
Here is the GitLab repository containing the playbooks and inventory files for creating a Cinder volume.
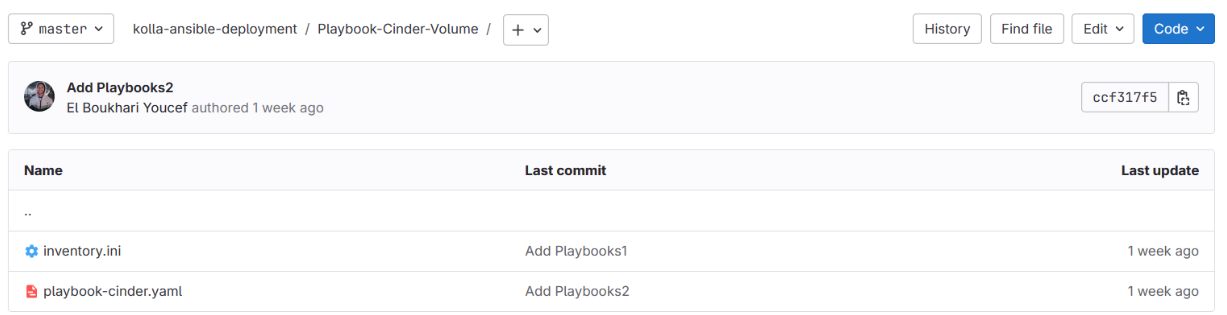
Therefore, to create a Cinder volume on a storage node, you simply need to execute this playbook.
However, to illustrate the commands, we attempted to create this volume manually on one of our nodes. Here are the steps to create it :
And there you have it—your private cloud is now ready! You can start creating your OpenStack instances, and any service available from a cloud provider can be deployed in your private cloud. 🚀
See you in the next blog…

- Deploying Shared Files in OpenStack: A Guide to Manila Security and Terraform Integration - March 4, 2026
- Integration of the Octavia module (Load Balancer as a Service) in an OpenStack Cloud Environment – Part 2 - December 7, 2025
- Integration of the Octavia module (Load Balancer as a Service) in an OpenStack cloud environment – Part 1 - December 7, 2025