)

Have you ever thought about creating your own on-premise private cloud? And on top of that, have you considered using containerization to deploy this infrastructure?
In this blog post, we’ll dive into deploying an OpenStack infrastructure with Kolla Ansible, focusing on how this tool simplifies and empowers large-scale cloud service management.
In the first part of this blog, we will focus exclusively on the All-in-One deployment method. This approach allows you to deploy all OpenStack services on a single node, making it a great starting point for setting up a private cloud infrastructure with Kolla Ansible.
Contents :
1- OpenStack Definition
2- OpenStack Components Overview
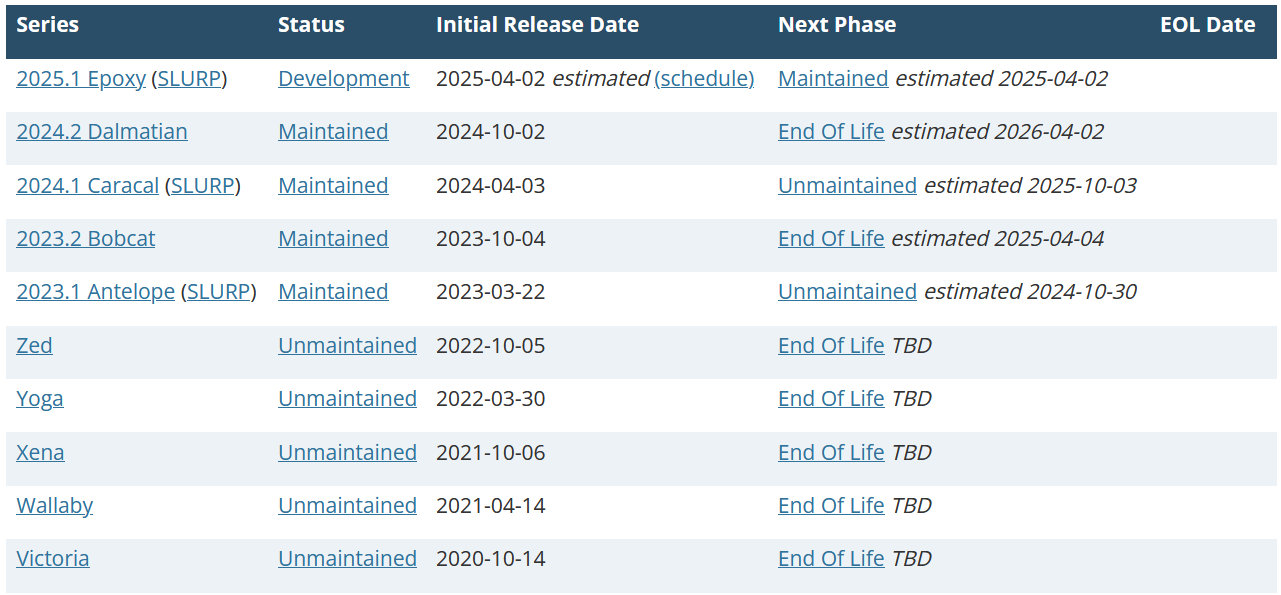
3- OpenStack Releases
4- OpenStack Deployment Tools (Kolla-Ansible)
5- Kolla-Ansible All-In-One Deployment
5.1- Host machine requirements
5.2- NAT and Host-Only Interfaces Definition
5.3- Setup and Installation of Kolla-Ansible
5.4- Validating and Configuring OpenStack Deployment
5.5- Launch OpenStack Instances
1- OpenStack Definition
OpenStack is a cloud operating system that controls large pools of compute, storage, and networking resources throughout a datacenter, all managed and provisioned through APIs with common authentication mechanisms.
A dashboard is also available, giving administrators control while empowering their users to provision resources through a web interface.
OpenStack provides an Infrastructure-as-a-Service (IaaS) solution through a variety of complemental services. Each service offers an Application Programming Interface (API) that facilitates this integration.
OpenStack is a free and open-source platform characterized by several key features :
1- Programmable Infrastructure : that lays a common set of APIs on top of compute, networking, and storage.
2- One Platform : for virtual machines, containers, and bare metal.
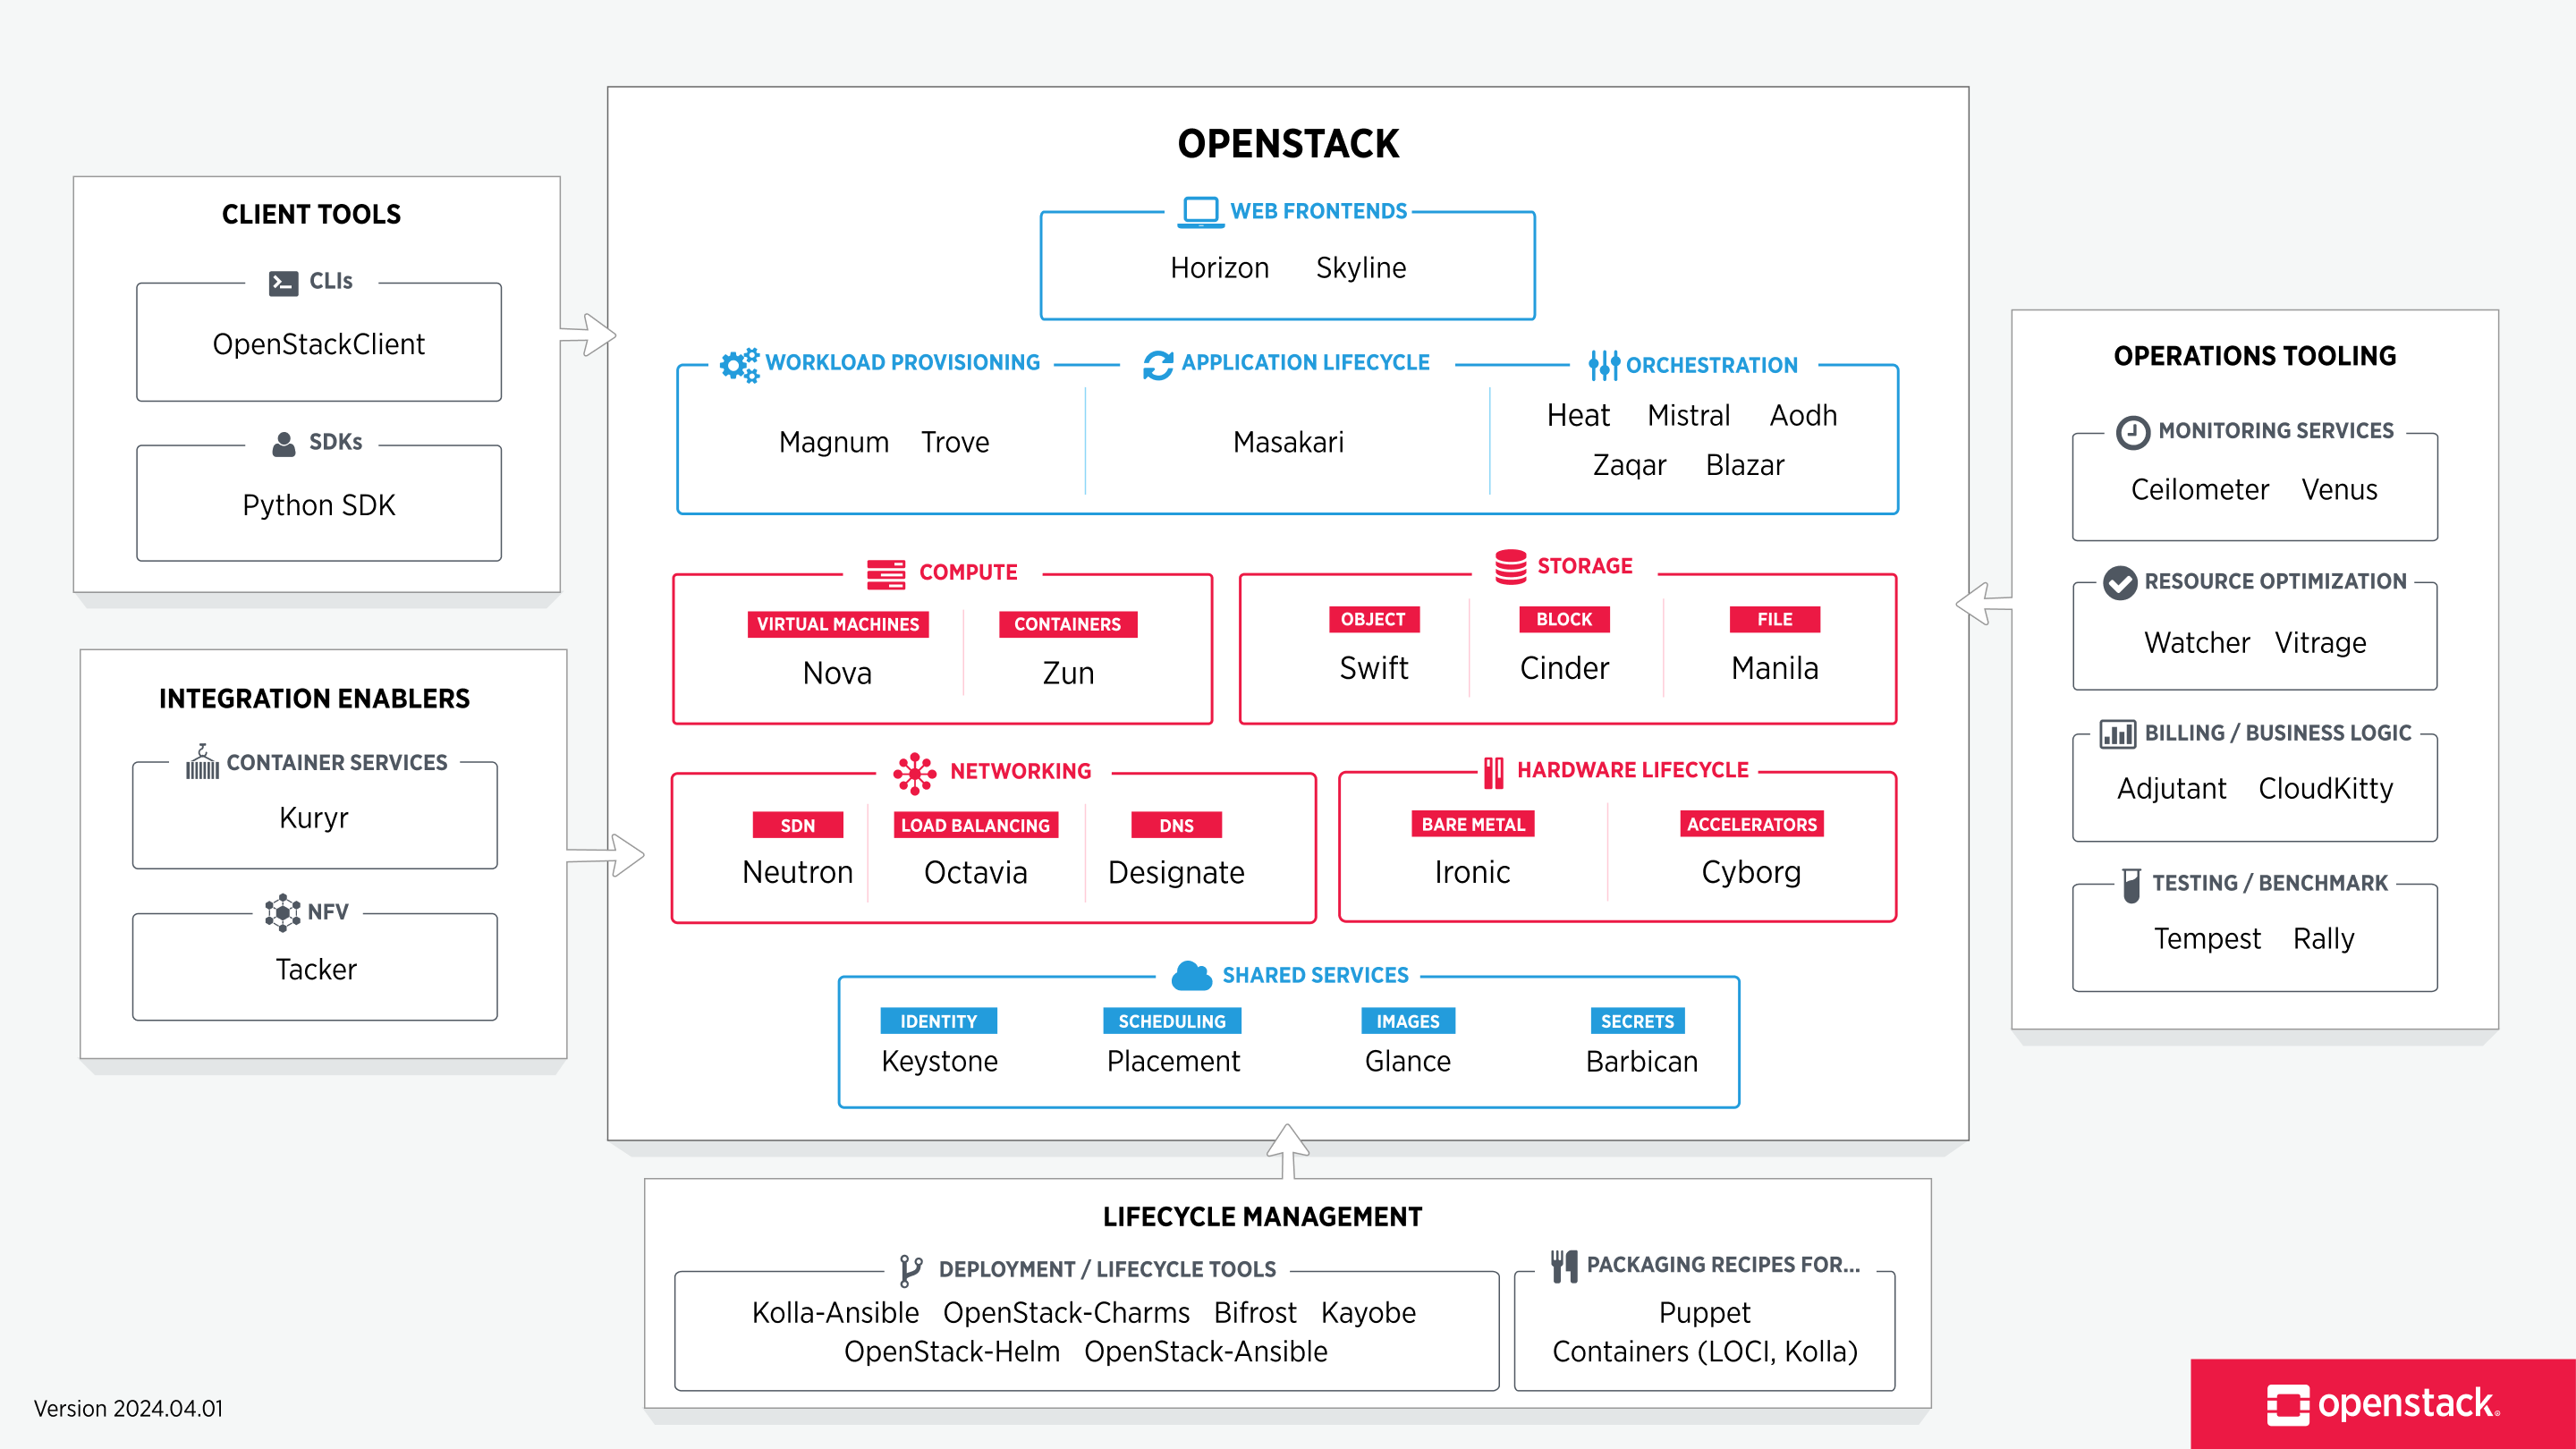
2- OpenStack Components Overview
An OpenStack deployment contains a number of components providing APIs to access infrastructure resources.
3- OpenStack Release
An OpenStack release refers to a specific version of the OpenStack software, which includes a set of new features, improvements, and bug fixes. Each release is named alphabetically and is supported for a certain period, ensuring stability and new capabilities for users and developers. OpenStack releases are updated versions of the platform, released every six months.
4- OpenStack Deployment Tools (Kolla-Ansible)
Deploying OpenStack efficiently requires leveraging various tools designed to streamline and automate the installation and configuration processes. In this section, we will explore several key deployment tools, each offering unique capabilities to facilitate the setup and management of OpenStack environments.
Deploys OpenStack in containers using Ansible, Kolla-Ansible deploys a containerised OpenStack control plane using Kolla containers, orchestrated via Ansible. The project aims for simplicity and reliability, while providing a flexible, intuitive configuration model.
5- Kolla-Ansible All-In-One Deployment
Kolla’s mission is to provide production-ready containers and deployment tools for operating OpenStack clouds.
Kolla Ansible is highly opinionated out of the box, but allows for complete customization. This permits operators with minimal experience to deploy OpenStack quickly and as experience grows modify the OpenStack configuration to suit the operator’s exact requirements.
The Kolla-Ansible All-In-One deployment is a setup method used to deploy a single-node OpenStack environment where all OpenStack services run on a single machine. This approach utilizes KollaAnsible, which is a tool that automates the deployment of OpenStack services using Docker containers and Ansible playbooks. The All-In-One deployment is particularly useful for development, testing, and demonstration purposes, providing a simplified and self-contained environment to explore OpenStack features without the complexity of a multi-node setup.
5.1- Host machine requirements
The host machine must satisfy the following minimum requirements :
- 2 Network Interfaces (NAT + Host-Only Network)
- 7GB main memory
- 50GB disk space
5.2- NAT and Host-Only Interfaces Definition
NAT (Network Address Translation) interfaces allow multiple devices on a private network to share a single public IP address for accessing external networks.
This interface type translates private IP addresses to a public IP address, enabling communication with external servers while keeping internal IP addresses hidden.
The use of NAT in an OpenStack Kolla Ansible deployment on an Ubuntu VM is a common practice that simplifies network management, enhances security, and ensures that instances have access to necessary external resources while maintaining an efficient and secure network configuration. In summary, NAT is used to facilitate internet access, isolate internal networks, simplify configuration, manage IP address conflicts, and support virtual environments.
The Host-Only interface creates an isolated network between the host machine and the virtual machines (VMs). This setup secures communication between OpenStack components without exposing them directly to the external network.
The Host-Only interface enables direct communication between the host machine and the VMs. This is beneficial for debugging, administration, and accessing OpenStack services without relying on an external network connection.
Now we will see all the network interfaces available on our Ubuntu VM :
5.3- Setup and Installation of Kolla-Ansible
5.3.1- Install dependencies
Typically commands that use the system package manager in this section must be run with root privileges.
To switch to root mode in Linux, you need to execute this command and then enter your password or use sudo for each commande.
$ sudo su
It is generally recommended to use a virtual environment to install Kolla Ansible and its dependencies, to avoid conflicts with the system site packages.
Install Python build dependencies, For Debian or Ubuntu, run :
$ sudo apt install git python3−dev libffi −dev gcc libssl −dev
5.3.2 Install dependencies for the virtual environment
- Install the virtual environment dependencies, For Debian or Ubuntu, run :
$ sudo apt install python3−venv
- Create a virtual environment and activate it :
$ python3 −m venv /home/youcef/Desktop/myenv
$ source /home/youcef/Desktop/myenv/bin/activate
The virtual environment should be activated before running any commands that depend on packages installed in it
- Ensure the latest version of pip is installed :
$ pip install −U pip
- Install Ansible. Kolla Ansible requires at least Ansible 8 (or ansible-core 2.15) and supports up to 9 (or ansible-core 2.16).
$ pip install ansible −core >=2.15
5.3.3 Install Kolla-ansible
- Install kolla-ansible and its dependencies using pip.
$ pip install git+https://opendev.org/openstack/kolla−ansible@master
- Create the /etc/kolla directory.
$ sudo mkdir −p /etc/kolla
$ sudo chown $USER:$USER /etc/kolla
- Copy globals.yml and passwords.yml to /etc/kolla directory.
$ cp −r /home/ youcef/Desktope/myenv/share/kolla−ansible/etc_examples/kolla/∗ /etc/kolla
- Copy all-in-one inventory file to the current directory.
$ cp −r /home/youcef/Desktope/myenv/share/kolla−ansible/etc_examples/kolla/∗/etc/kolla
5.3.4 Install Ansible Galaxy requirements
- Install Ansible Galaxy dependencies :
$ k olla−ansible install −deps
5.3.5 Prepare initial configuration
- Inventory : The next step is to prepare our inventory file. An inventory is an Ansible file where we specify hosts and the groups that they belong to. We can use this to define node roles and access credentials.
Kolla Ansible comes with all-in-one and multinode example inventory files. The difference between them is that the former is ready for deploying single node OpenStack on localhost. In this guide we will show the all-in-one installation.
- Kolla passwords : Passwords used in our deployment are stored in /etc/kolla/passwords.yml file. All passwords are blank in this file and have to be filled either manually or by running random password generator :
$ kolla −genpwd
- Kolla globals.yml : globals.yml is the main configuration file for Kolla Ansible and per default stored in /etc/kolla/globals.yml file. There are a few options that are required to deploy Kolla Ansible :
1- Image options : User has to specify images that are going to be used for our deployment, Kolla provides choice of several Linux distributions in containers such as Ubuntu, CentOS Stream (centos)
![]()
![]()
2- Networking :Kolla Ansible requires a few networking options to be set. We need to set network interfaces used by OpenStack. First interface to set is “network_interface”.

![]()
This is the default interface for multiple management-type networks. In our case, we use a NAT interface for the primary network interface Second interface required is dedicated for Neutron external (or public) networks, can be vlan or flat, depends on how the networks are created.
This interface should be active without IP address. If not, instances won’t be able to access to the external networks.In our case, we use a Host-Only interface for the second network interface
Next we need to provide floating IP for management traffic. This IP will be managed by keepalived to provide high availability, and should be set to be not used address in management network that is connected to our network_interface. If you use an existing OpenStack installation for your deployment, make sure the IP is allowed in the configuration of your VM.
5.3.6 Deployment
After configuration is set, we can proceed to the deployment phase. First we need to setup basic host-level dependencies, like docker. Kolla Ansible provides a playbook that will install all required services in the correct versions. The following assumes the use of the all-in-one inventory. If using a different inventory, such as multinode, replace the -i argument accordingly.
1- Bootstrap servers with kolla deploy dependencies : This step involves preparing the servers by installing all necessary dependencies required for Kolla-Ansible deployment. It ensures that each server in the deployment environment has the correct software and configurations needed for a successful setup of OpenStack services using Kolla-Ansible
$ kolla −ansible −i . / all−in−one bootstrap−servers
2- Do pre-deployment checks for hosts : Before proceeding with the deployment, it is crucial to perform pre-deployment checks on all hosts. These checks ensure that the system meets all the necessary prerequisites and configurations required for a successful Kolla-Ansible deployment. This includes verifying hardware specifications, network configurations, and software dependencies, as well as ensuring that the hosts are properly prepared and consistent in their setup
$ kolla−ansible −i . / all−in−one prechecks
3- Finally proceed to actual OpenStack deployment : deploy Docker containers for each OpenStack service
$ kolla−ansible −i . / all−in−one deploy
After the complete deployment of OpenStack services with Kolla-Ansible, all these services are deployed as Docker containers. You can list all these containers using the docker ps command
5.3.7 Using OpenStack
1- Install the OpenStack CLI client :
This command installs the ’python-openstackclient’ package, which is the command-line client for interacting with OpenStack.
$ pip install python−openstack clientc-https://releases.openstack.org/constraints/upper/master
5.4 Validating and Configuring OpenStack Deployment
5.4.1 Verify Access to Horizon
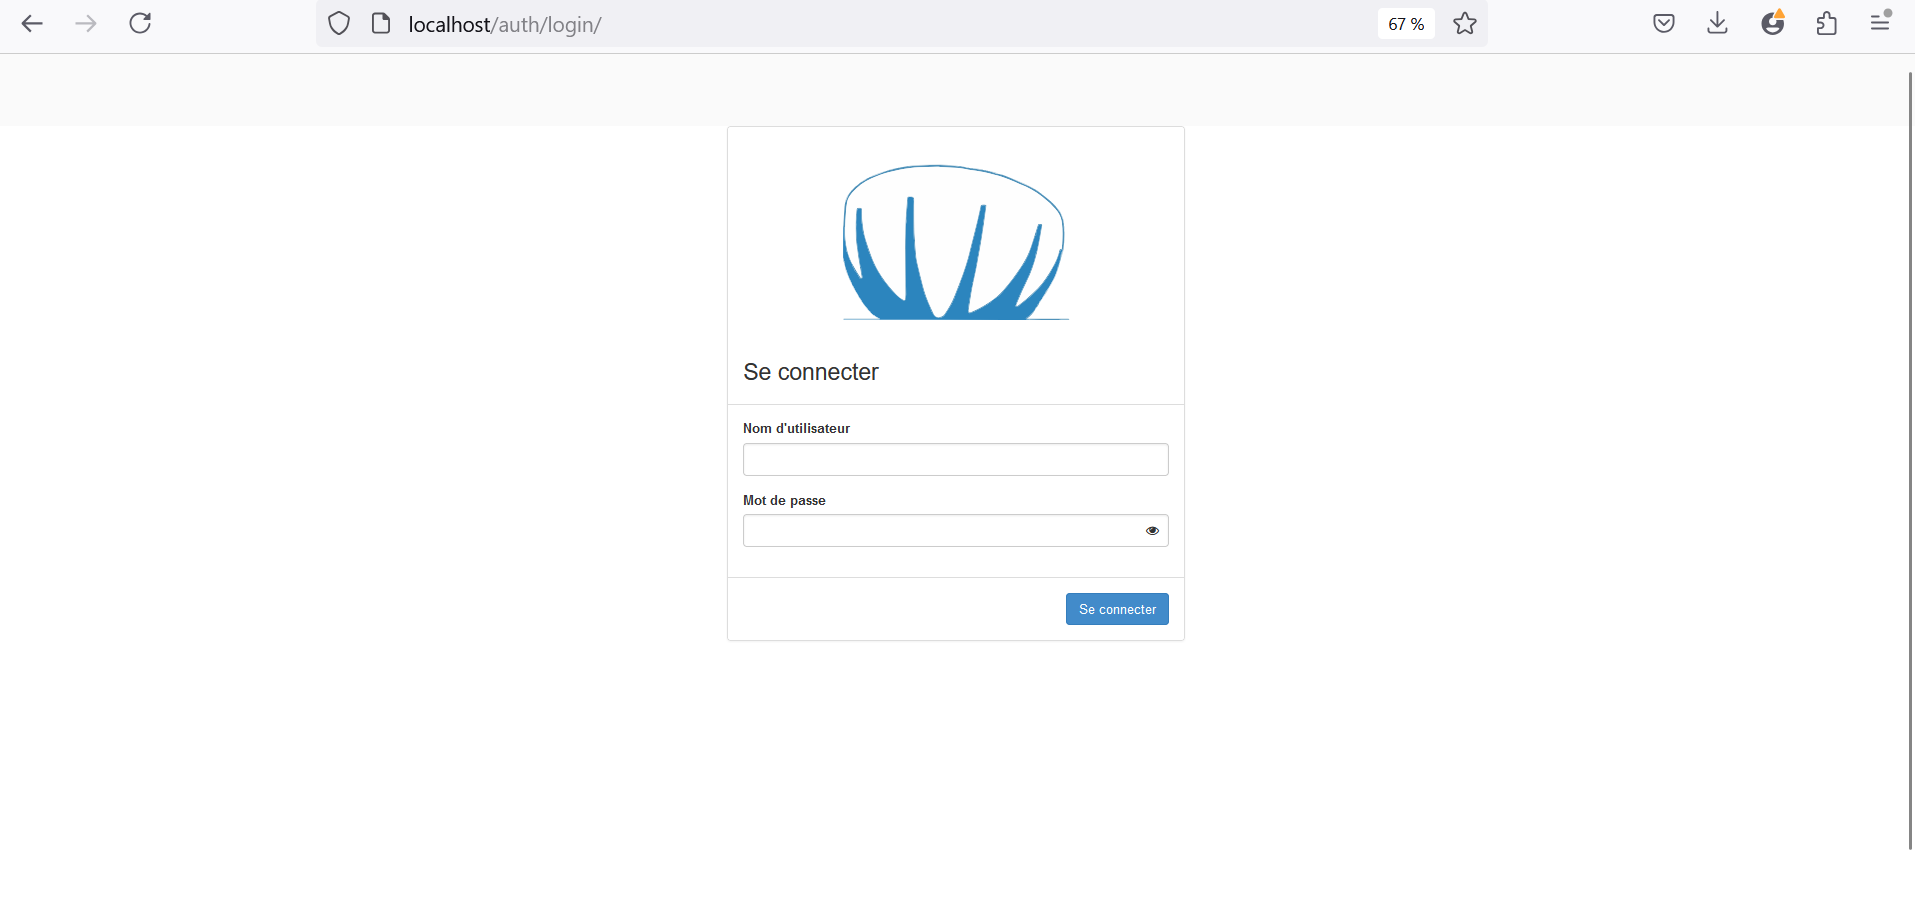
After deploying OpenStack using Kolla-Ansible, the next step is to ensure that we can access the Horizon dashboard. Horizon is the web-based interface for managing and interacting with OpenStack services. This step involves confirming that the Horizon dashboard is operational and accessible from a web browser, which is essential for performing administrative tasks and managing resources within the OpenStack environment.
To access our Horizon dashboard, use the IP address of our NAT interface. By default, the Horizon service runs on port 80.For the username, use admin, and for the password, retrieve it from the password.yaml file generated during our Kolla-Ansible deployment.
![]()
![]()
And finally, we successfully accessed our Horizon dashboard.
5.4.2 Customizing Horizon with Our Cloud Logo
5.5 Launch OpenStack Instances
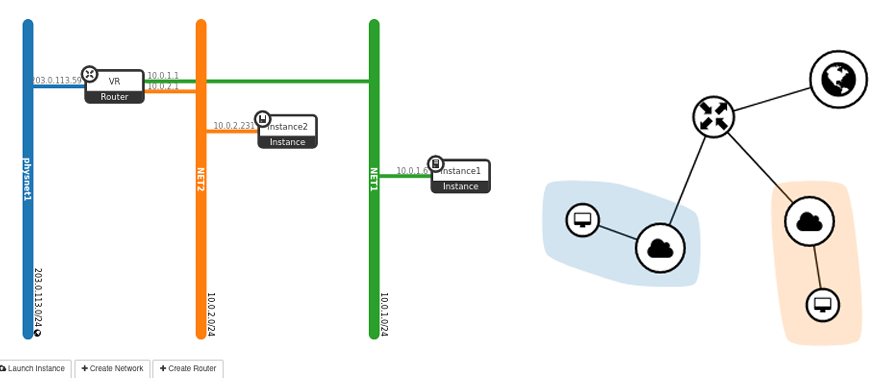
The main idea of our network setup is to create two internal networks, NET1 and NET2. Within each of these subnets, we have deployed an instance, named instance 1 and instance 2, respectively.
A router (VR) has been added to connect the two networks, enabling communication between instance 1 and instance 2, such as pinging from one to the other. Additionally, we have set up an external network (provider network) that allows our instances to be accessible from outside the network, enabling us to reach them via SSH. Floating IPs are dynamic public IP addresses that can be assigned to instances, allowing them to be accessible from the external network. Unlike fixed IPs, floating IPs can be moved from one instance to another.
5.5.1 Registering the CirrOS Image in Glance
1- Source the admin credentials to gain access to admin-only CLI commands :
$ source/etc/kolla/admin.openrc.sh
2- Download the source image :
$ wget http://download.cirros−cloud.net/0.3.4/cirros−0.3.4−x86_64−disk.img
3- Upload the image to the Image service using the QCOW2 disk format, bare container format, and public visibility so all projects can access it, then Confirm upload of the image and validate attributes.
5.5.2 Creating a Simple Nova Flavor
In OpenStack, flavors define the compute, memory, and storage capacity of nova computing instances. To put it simply, a flavor is an available hardware configuration for a server. It defines the size of a virtual server that can be launched. The smallest default flavor consumes 512 MB memory per instance. For environments with compute nodes containing less than 4 GB memory, we recommend creating the m1.nano flavor that only requires 64 MB per instance. Only use this flavor with the CirrOS image for testing purposes.
$ openstack flavor create −−id0−−vcpus 1 −−ram 64 −−disk1 m1. nano
5.5.3 Generate a key pair
Most cloud images support public key authentication rather than conventional password authentication. Before launching an instance, you must add a public key to the Compute service
$ ssh−keygen −q −N “”
$ openstack key pair create −−public−key ~/. ssh/id_ rsa.pub mykey
5.5.4 Add security group rules
By default, the default security group applies to all instances and includes firewall rules that deny remote access to instances. For Linux images such as CirrOS, we recommend allowing at least ICMP (ping) and secure shell (SSH).
Permit ICMP (ping) :
$ openstack security group rule create −−proto icmp default
Permit secure shell (SSH) access :
$ open stack security group rule create −−proto tcp −−dst−port 22 default
5.5.5 Create Provider Network
Before launching an instance, you must create the necessary virtual network infrastructure, an instance uses a provider (external) network that connects to the physical network infrastructure via layer-2 (bridging/switching). This network includes a DHCP server that provides IP addresses to instances.
- Create the network :

The –provider-physical-network provider and –provider-network-type flat options connect the flat virtual network to the flat (native/untagged) physical network on the br-ex bridge, which can have a port which is connected to enp0s8 on the host
- Create the subnet :

We chose to use the same IP addresses for the external network in OpenStack as those of our Host-Only interface to streamline network management and ensure seamless communication between our virtual machines and the host system. By aligning the IP address ranges, we can easily access and manage our instances from the host machine, providing a consistent and controlled environment. This approach simplifies the setup, avoids potential conflicts, and leverages the existing network configuration for efficient connectivity and administration.
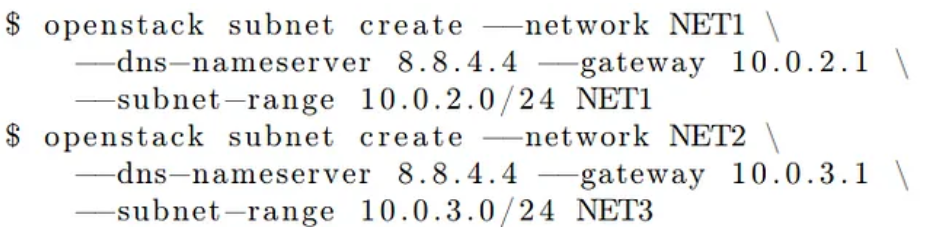
5.5.6 Create Internal Networks
- Create the networks :
![]()
- Create a subnet on the networks :
5.5.7 Create a router
Self-service networks connect to provider networks using a virtual router that typically performs bidirectional NAT. Each router contains an interface on at least one self-service network and a gateway on a provider network.
The provider network must include the router :external option to enable self-service routers to use it for connectivity to external networks such as the Internet. The admin or other privileged user must include this option during network creation or add it later.
In this case, the router :external option was set by using the –external parameter when creating the provider network.
$ openstack router create router
Add the self-service (NET1 and NET2) network subnet as an interface on the router :
$ openstack router add subnet router NET1
$ openstack router add subnet router NET2
Set a gateway on the provider network on the router :
$ openstack router add subnet router physnet1
5.5.8 Launch the instance
Determine instance options :
To launch an instance, you must at least specify the flavor, image name, network, security group, key, and instance name.
As previously mentioned, we have created two internal networks, NET1 and NET2. Now, within each network, we will deploy an instance, named instance1 and instance2, respectively.

Check the status of your instance :
$ openstack server list
5.5.9 Access the instance remotely (Floating IPs)
Floating IPs are dynamic public IP addresses that can be assigned to instances, allowing them to be accessible from the external network. Unlike fixed IPs, floating IPs can be moved from one instance to another.
Public Accessibility : Enables instances to be publicly accessible, facilitating access to the applications and services they host.
Resource Flexibility : Provides the ability to reassign IPs as needed, offering greater management flexibility.
Redundancy and High Availability : Supports redundancy and high availability by allowing public access to be shifted from a failed instance to a functioning one.
Create a floating IP address on the provider virtual network :
$ openstack floating ip create provider
Associate the floating IP address with the instance :
![]()
Check the status of your floating IP address :

After creating our instances, we found that their status remained in a “down” state, indicating an error. To resolve this issue, we enabled nested virtualization.
In the next blog, we’ll dive into the Multinode deployment method, where OpenStack services are distributed across multiple nodes to enhance scalability and reliability. Stay tuned for a deeper look into this advanced setup with Kolla Ansible!

- Deploying Shared Files in OpenStack: A Guide to Manila Security and Terraform Integration - March 4, 2026
- Integration of the Octavia module (Load Balancer as a Service) in an OpenStack Cloud Environment – Part 2 - December 7, 2025
- Integration of the Octavia module (Load Balancer as a Service) in an OpenStack cloud environment – Part 1 - December 7, 2025