Managing physical servers as if they were virtual machines (VMs) in a cloud environment? Infrastructure-as-Code (IaC) and CI/CD Pipelines with physical nodes? Let’s try to demystify some preconceptions about private cloud infrastructures and bare metal lifecycle with practical, simple, and reproducible examples, starting with a minimal OpenStack Ironic “standalone” setup.
By the end of this lab, we will be able to:
- Install and manage a simple Bare Metal Provisioning system using OpenStack Kolla and Ironic.
- Manage a generic lifecycle for physical servers: onboarding, resource collection, operating system installation, recovery in case of malfunction, decommissioning.
- Apply IaC methodologies for node and application provisioning.
Subsequently, once familiar with Ironic in “standalone” mode, it will be simpler to integrate it with other OpenStack services such as Keystone, Cinder, Nova, and Neutron, to expand its functionalities and transform the data center into a real private cloud capable of managing bare metal workloads as well as VMs.
Introduction
Anyone who deals daily with physical servers, manual provisioning, drivers, BIOS, and the complexity of keeping an extensive fleet of machines updated, knows how time-consuming and error-prone bare metal management (i.e., physical servers without a pre-installed operating system) can be.
You’re surely familiar, at least in theory, with OpenStack, the open-source cloud service suite that allows you to manage virtual resources (VMs, network, storage) programmatically and “as-a-Service.” Ironic is simply the OpenStack component that extends this philosophy to the physical world.
OpenStack Ironic is a bare metal provisioning and management service that integrates physical servers into the OpenStack framework, treating them as cloud resources. This means a physical server can be requested, allocated, configured, and released via API, just as you would with a virtual machine.
This isn’t about virtualization: Ironic doesn’t create VMs on physical hardware. Ironic manages the physical hardware itself, installing the operating system directly on the machine, without intermediate virtualization layers.
Managing the Bare Metal Lifecycle
Traditionally, managing the lifecycle of a bare metal server is a process involving several phases, often manual and time-consuming:
- Purchase and Physical Installation: Receiving, mounting, cabling.
- BIOS/UEFI Configuration: Manual access, specific settings.
- RAID Controller Configuration: Array creation, disk configuration.
- Operating System Installation: Boot from CD/USB/PXE, manual or semi-automatic installation.
- Post-Installation Configuration: Drivers, software, network, security hardening.
- Maintenance and Updates: Patching, firmware upgrades.
- Decommissioning: Disk wipe, removal.
With Ironic, the entire process transforms, embracing the “as-a-Service” paradigm:
- Discovery and Registration (Onboarding): Machines are “discovered” by Ironic (often via PXE boot and an agent) and registered in its inventory. Once registered, Ironic can directly interact with their BMC (Baseboard Management Controller, such as iLO, iDRAC, IMM).
- “As-a-Service” Provisioning: A user (or an automated service) can request a physical server with specific characteristics (CPU, RAM, storage) via OpenStack APIs. Ironic selects an available server, powers it on, installs the chosen operating system (GNU/Linux, Windows, VMware ESXi, etc.), configures the network, and makes it available in a short time.
- Remote and Automated Management: Thanks to integration with BMCs, Ironic can programmatically perform operations such as power on/off, reboot, reset, boot device management, firmware updates (via plugins), and even BIOS/UEFI settings, all without any manual intervention.
- Decommissioning and Cleaning: When a server is no longer needed, Ironic can perform secure disk wiping and reset BIOS/UEFI settings, returning the server to a “clean” state available for reuse or final decommissioning, all automatically.
- Integration with Other OpenStack Services: Last but not least, Ironic can integrate with Neutron for physical network management, Glance for operating system image management, Cinder to provide persistent storage, and Horizon for a unified GUI. This allows for building complex solutions where bare metal is an extension of your cloud infrastructure, enabling not only the consumption of resources as-a-Service but also automated interactions like CI/CD pipelines.
1 Lab Environment
Let’s consider a simplified environment, so we can set it up with minimal effort and focus primarily on the bare metal provisioning mechanism:
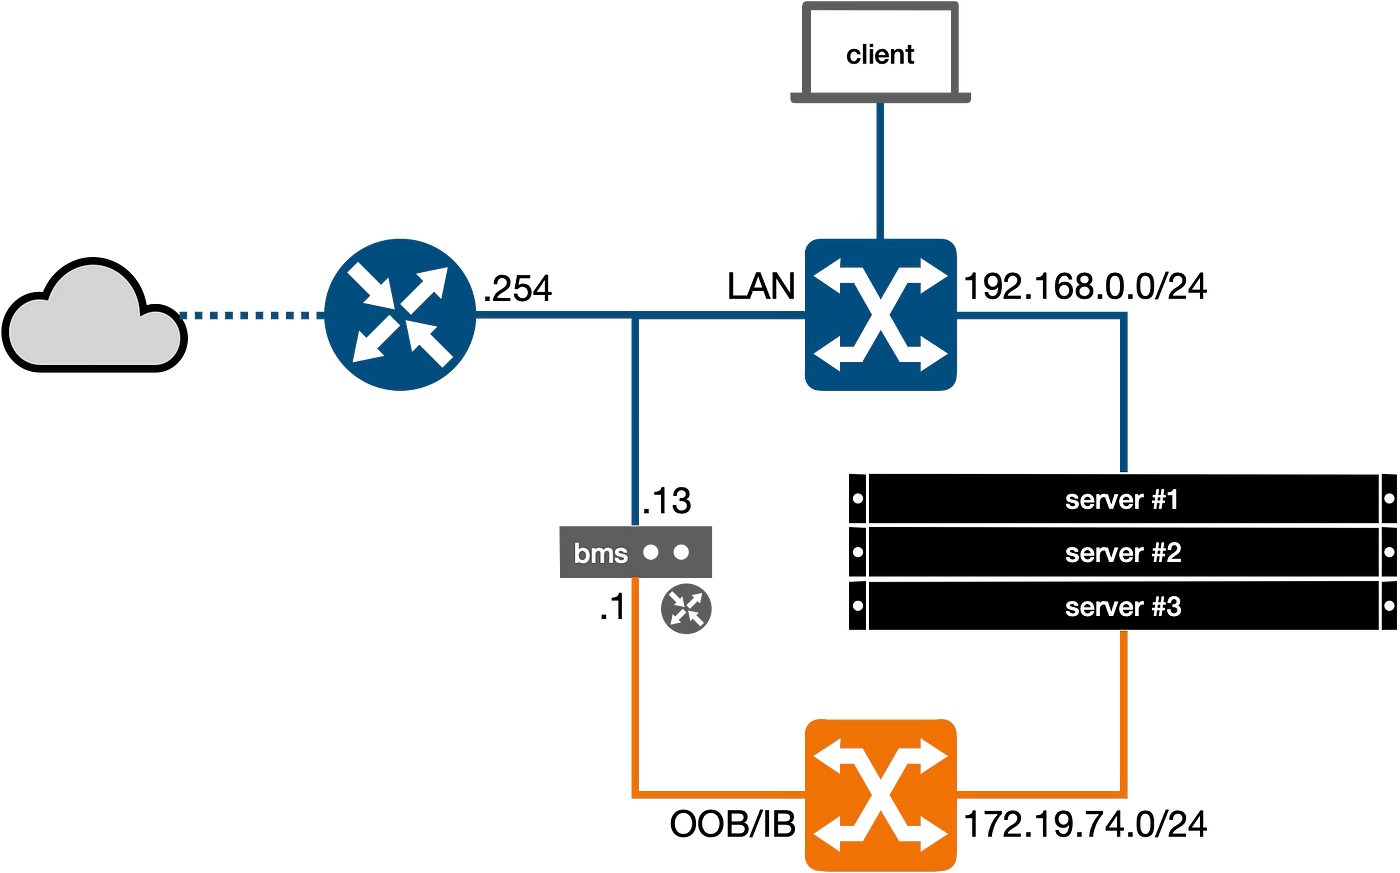
- LAN Network
192.168.0.0/24: Also referred to as the public network, this will be unified for clients and servers and connected to the internet via a router (.254) that issues IP addresses via DHCP within the range x.x.x.101-199. - OOB/IB Network
172.19.74.0/24: This separate network is managed by a small server (labeled as “bms” in the figure) to control the provisioning of bare metal nodes. These nodes are connected via BMC for Out-of-Band management (iLO, iDRAC, IMM, etc.) and via an Ethernet network card for In-Band management (deployment, inspection, rescue, etc.).
Both switches are unmanaged and without VLANs, allowing for the use of “off-the-shelf” hardware or easy simulation with enterprise equipment or, alternatively, with a virtualized environment.
1.1 Server for the Bare Metal Service
The bms server, where the bare metal provisioning environment will be installed, doesn’t require extensive resources. The minimum necessary specifications are 4GB of RAM, 2 CPU cores, 2 NICs, and at least 200GB of disk space (needed to host and build OS images and containers). However, it’s recommended to use at least 8GB of RAM and 4 CPU cores to allow for future expansion of the environment with additional services.
On the software side, the following main components will be used:
- OpenStack 2025.1 (Epoxy): As of this writing, this is the most recent OpenStack release for which ready-to-use containers have been released for Kolla and Kolla Ansible (the system used here for deploying OpenStack itself).
- Debian GNU/Linux 12 (Bookworm): Although OpenStack is largely agnostic to various GNU/Linux distributions (especially when installed via containers), Debian will be used to avoid favoring commercial distributions.
- Podman: This offers a lightweight and integrated alternative to Docker, while maintaining compatibility with the existing ecosystem and also aligning with “Pod” infrastructures like Kubernetes.
2 Creating the Lab Environment
- Installation of the bms server;
- Installation of the Podman container management system;
- Creation of a kolla administration user;
- Creation of a Python Virtual Environment;
- Installation of OpenStack Kolla Ansible;
- Minimal configuration for Bare Metal Provisioning;
- Deployment of OpenStack.
2.1 Server Installation (bms)
For the operating system installation, choose your preferred GNU/Linux version and adapt the configurations accordingly:
root@bms:~# cat /etc/network/interfaces
auto lo
iface lo inet loopback

auto enp1s0
iface enp1s0 inet static
    address 192.168.0.13/24
    gateway 192.168.0.254

auto enp2s0
iface enp2s0 inet static
    address 172.19.74.1/24

root@bms:~# cat /etc/hosts
127.0.0.1 localhost
172.19.74.1 bms.ironic.lab bms

root@bms:~# hostname -i
172.19.74.1

root@bms:~# hostname -f
bms.ironic.lab
enp1s0 (192.168.0.13/24): LAN networkenp2s0 (172.19.74.1/24): OOB/IB network
It’s crucial for the Kolla Ansible project that the server name – bms and bms.ironic.lab in this scenario – resolves to the IP address where the internal OpenStack services will be listening (172.19.74.1). In the proposed lab, this IP address coincides with the OOB/IB management network.
2.2 Podman
Being a drop-in replacement for Docker, Podman is easy to use, even for newcomers. Installation is quite straightforward as it’s included as a standard package in most GNU/Linux distributions:
root@bms:~# apt install -y podman
...

root@bms:~# podman info
host:
  arch: amd64
  buildahVersion: 1.28.2
  cgroupControllers:
  - cpu
  - memory
  - pids
cgroupManager: systemd
cgroupVersion: v2
...
version:
  APIVersion: 4.3.1
  Built: 0
  BuiltTime: Thu Jan 1 01:00:00 1970
  GitCommit: ""
  GoVersion: go1.19.8
  Os: linux
  OsArch: linux/amd64
  Version: 4.3.1
If you’re accustomed to using Docker and want to retain the docker command for convenience, you can also install the podman-docker package, which creates a dedicated wrapper for this purpose. However, for most cases, a simple alias docker=podman might suffice.
Among the most apparent differences from Docker, Podman runs containers with the user that invokes it, without relying on a centralized daemon. If multiple users run containers, they will only be visible via the podman container ps command to the user who owns them; the root user is no exception.
2.3 Administration User
Creating an administrative user (e.g., kolla), with which to perform various operations, is always a good practice in terms of security and functionality to keep the deployment environment separate from your personal user or the root user:
root@bms:~# useradd --system --add-subids-for-system \
  -d /var/lib/kolla \
  -c 'Kolla Administrator' \
  -s /bin/bash \
  -m kolla

root@bms:~> passwd kolla
New password: *********
Retype new password: *********
passwd: password updated successfully
NOTE: the --add-subids-for-system option is necessary to allow the execution of rootless containers, even for system users.
Ensure that the user is able to execute commands as root via sudo:
root@bms:~# echo 'kolla ALL=(ALL:ALL) NOPASSWD:ALL' >/etc/sudoers.d/kolla
Now we can connect with the kolla administration user and proceed with the server configuration.
2.4 Python Virtual Environment (venv)
The OpenStack components for bare metal provisioning and for deploying OpenStack itself are also available as PyPI packages. In most recent GNU/Linux distributions, installing Python packages at the system level is strongly discouraged. The most convenient way to have a Python environment with the necessary software, without “polluting” the system’s Python environment, is to create a Python virtual environment associated with the previously created administration user:
kolla@bms:~$ sudo apt install -y \
  python3-dbus \
  python3-venv
...

kolla@bms:~$ python3 -m venv --system-site-packages $HOME
...

kolla@bms:~$ cat >>~/.profile <<EOF

# activate the Python Virtual Environment
if [ -f "\$HOME/bin/activate" ]; then
    . "\$HOME/bin/activate"
fi
EOF

kolla@bms:~$ source ~/bin/activate

kolla@bms:~$ python3 -m pip install -U pip
Modifying the .profile file in the user’s home directory enables automatic activation of the virtual environment upon each login. Meanwhile, using the --system-site-packages option allows access to system Python libraries (e.g., python3-dbus) without needing to reinstall them.
NOTE: To install the dbus-python package (the equivalent of the system package python3-dbus) within the virtual environment, thereby avoiding the --system-site-packages option, you need to install the development tools: sudo apt install build-essential pkg-config libdbus-1-dev libglib2.0-dev python3-dev. If you choose this path, it’s a good idea to remove the compilers after installation in production environments.
2.5 OpenStack Kolla Ansible
The primary goal of the Kolla Ansible project is to simplify and maximize the efficiency of OpenStack’s configuration and management. To achieve this, it leverages Ansible for automation and reproducibility, and encapsulates OpenStack components within Docker containers to streamline their deployment, updating, and scalability.
Kolla Ansible relies on a specific and strict chaining of Python packages and their respective versions. Using the previously configured Python Virtual Environment helps maintain separation and consistency between various versions of the kolla-ansible package, particularly Ansible itself and its various Ansible Galaxy library dependencies.
kolla@bms:~$ sudo apt install -y tree yq
...

kolla@bms:~$ python3 -m pip install kolla-ansible docker podman
...

kolla@bms:~$ kolla-ansible --version
kolla-ansible 19.4.0

kolla@bms:~$ kolla-ansible install-deps
Installing Ansible Galaxy dependencies
Starting galaxy collection install process
Process install dependency map
...

kolla@bms:~$ ansible --version
ansible [core 2.17.9]
  config file = None
  configured module search path = ['/var/lib/kolla/.ansible/plugins/modules', '/usr/share/ansible/plugins/modules']
  ansible python module location = /var/lib/kolla/lib/python3.11/site-packages/ansible
  ansible collection location = /var/lib/kolla/.ansible/collections:/usr/share/ansible/collections
  executable location = /var/lib/kolla/bin/ansible
  python version = 3.11.2 (main, Nov 30 2024, 21:22:50) [GCC 12.2.0] (/var/lib/kolla/bin/python3)
  jinja version = 3.1.6
  libyaml = True
NOTE: The tree and yq packages are not essential; they contain utilities used in this article for directory inspection and simplifying the management of YAML and JSON files.
Let’s install the OpenStack command-line client:
kolla@bms:~$ python3 -m pip install \
  -c https://releases.openstack.org/constraints/upper/master \
  python-openstackclient \
  python-ironicclient
Optionally, if you want to enable command auto-completion via the [tab] key upon login, you can create the following files and directories:
kolla@bms:~$ mkdir ~/.bash_completion.d

kolla@bms:~$ openstack complete >~/.bash_completion.d/openstack

kolla@bms:~$ cat >~/.bash_completion <<EOF
# load local bash completion
if [[ -d ~/.bash_completion.d ]]; then
    for i in ~/.bash_completion.d/*; do
        [[ -f \$i && -r \$i ]] && . "\$i"
    done
fi
EOF
To configure Kolla Ansible, you need to provide a pair of YAML files, globals.yml and passwords.yml, which define the configuration and the set of credentials associated with the system users of the various enabled components. Additionally, an Ansible inventory file is required. All these files should be placed in the default directory /etc/kolla or in the directory specified by the KOLLA_CONFIG_PATH environment variable.
Leveraging the kolla system user’s home directory, we’ll place all configuration files in /var/lib/kolla/etc.
NOTE: Having a configuration directory different from the default (/etc/kolla) prevents accidental deletion of its files if the Kolla environment is reset (e.g., using the kolla-ansible destroy command).
For the inventory, we’ll use the provided example all-in-one file, similar to the passwords.yml file. The latter is a template that will be populated later with the kolla-genpwd command:
kolla@bms:~$ export KOLLA_CONFIG_PATH=~/etc

kolla@bms:~$ cat >>~/.bashrc <<EOF

# Kolla Ansible default config path
export KOLLA_CONFIG_PATH=~/etc
EOF

kolla@bms:~$ cp -a ~/share/kolla-ansible/etc_examples/kolla $KOLLA_CONFIG_PATH

kolla@bms:~$ kolla-genpwd --passwords $KOLLA_CONFIG_PATH/passwords.yml

kolla@bms:~$ mkdir -p $KOLLA_CONFIG_PATH/ansible/inventory

kolla@bms:~$ ln -s ~/share/kolla-ansible/ansible/inventory/all-in-one $KOLLA_CONFIG_PATH/ansible/inventory/
Meanwhile, we will replace the globals.yml configuration file with a minimal version:
---
# Host config
kolla_base_distro: "debian"
kolla_container_engine: "podman"

# OpenStack 'master' or release version
openstack_release: "2025.1"
#openstack_tag_suffix: "-aarch64"

# OpenStack services
enable_fluentd: false
enable_haproxy: false
enable_memcached: false
enable_proxysql: false
enable_openstack_core: false
enable_ironic: true

# Kolla config
network_interface: "enp2s0"
kolla_internal_vip_address: "172.19.74.1"

# Ironic config
ironic_dnsmasq_interface: "{{ network_interface }}"
ironic_dnsmasq_dhcp_ranges:
- range: "172.19.74.101,172.19.74.199,255.255.255.0"
routers: "172.19.74.1"
NOTE: If you’re using a system based on ARM processors, the containers must also adhere to the same architecture. Simply uncomment the line openstack_tag_suffix: "-aarch64" to download the correct containers.
Before using the Ansible playbooks and trying to decipher any error messages expressed in JSON, it might be convenient to use a slightly more readable output format, such as YAML:
kolla@bms:~$ cat >~/.ansible.cfg <<EOF
[defaults]
stdout_callback = yaml
EOF
To verify that everything is correct, let’s run the kolla-ansible prechecks command:

The error message we receive in red indicates the absence of two files that represent the Ironic Python Agent (IPA) kernel and ramdisk:
failed: [localhost] (item=ironic-agent.kernel) => changed=false
  ansible_loop_var: item
  failed_when_result: true
  item: ironic-agent.kernel
  stat:
    exists: false
failed: [localhost] (item=ironic-agent.initramfs) => changed=false
  ansible_loop_var: item
  failed_when_result: true
  item: ironic-agent.initramfs
  stat:
    exists: false
As the name suggests, it is an agent written in Python, which acts as an intermediary between the bare metal server and OpenStack Ironic. It consists of a live, in-memory GNU/Linux operating system that is loaded onto the server to be managed via network boot (PXE).
For now, we will download a pre-built one from the OpenStack archive (https://tarballs.opendev.org/openstack/ironic-python-agent/dib/files/):
kolla@bms:~$ mkdir -p $KOLLA_CONFIG_PATH/config/ironic

kolla@bms:~$ curl https://tarballs.opendev.org/openstack/ironic-python-agent/dib/files/ipa-centos9-master.kernel \
  -o $KOLLA_CONFIG_PATH/config/ironic/ironic-agent.kernel

kolla@bms:~$ curl https://tarballs.opendev.org/openstack/ironic-python-agent/dib/files/ipa-centos9-master.initramfs \
  -o $KOLLA_CONFIG_PATH/config/ironic/ironic-agent.initramfs
These two files (ironic-agent.kernel and ironic-agent.initramfs) must be placed in the $KOLLA_CONFIG_PATH/config/ironic/ directory. They will later be replaced with a custom version created specifically for our needs.
Now we can rerun the kolla-ansible prechecks command:

NOTE: Every reported error must be corrected, and the prechecks step re-executed until a clean result (errors=0) is achieved.
2.6 OpenStack Ironic “Standalone” Configuration
In “standalone” mode, Ironic can operate independently of other OpenStack services. This allows you to use its functionalities without needing to install the entire cloud platform (though you do forgo a range of advanced features that a Private Cloud environment could offer). For this reason, the $KOLLA_CONFIG_PATH/globals.yml file contains the following lines:
...<SNIP>...
enable_openstack_core: false
enable_ironic: true
...<SNIP>...
The enable_openstack_core: false option disables all components that would otherwise be automatically installed by Kolla Ansible, including Keystone, Glance, Nova, Neutron, Heat, and Horizon. Conversely, enable_ironic: true enables only Ironic.
2.6.2 Ironic Configuration
The ironic.conf configuration file, to be placed in $KOLLA_CONFIG_PATH/config/, must contain specific directives to enable the types of BMCs to be supported (Ironic refers to these as Hardware Types) and other instructions on how to manage specific areas.
For each area managed by Ironic, there are corresponding “interfaces” to control actions:
- BIOS: Manages BIOS settings.
- Boot: Provides boot mechanisms (e.g., PXE, virtual-media, etc.).
- Console: Accesses the serial console.
- Deploy: Manages node installation and cleaning.
- Firmware: Updates BIOS/UEFI, RAID controllers, etc.
- Inspect: Collects hardware configurations.
- Management: Manages server boot mode.
- Network: Interacts with OpenStack’s networking service.
- Power: Manages power state.
- RAID: Configures RAID volumes.
- Rescue: Provides recovery functionalities.
- Storage: Interacts with OpenStack’s storage system.
- Vendor: Offers additional vendor-specific functionalities.
[DEFAULT]
enabled_hardware_types = ipmi,redfish

enabled_bios_interfaces = no-bios
enabled_boot_interfaces = ipxe
enabled_console_interface = no-console
enabled_deploy_interfaces = direct
enabled_firmware_interfaces = no-firmware
enabled_inspect_interfaces = agent
enabled_management_interfaces = ipmitool,redfish
enabled_network_interfaces = noop
enabled_power_interfaces = ipmitool,redfish
enabled_raid_interfaces = agent
enabled_rescue_interfaces = agent
enabled_storage_interfaces = noop
enabled_vendor_interfaces = ipmitool,redfish

[conductor]
deploy_kernel = http://{{ ironic_http_interface_address }}:{{ ironic_http_port }}/ironic-agent.kernel
deploy_ramdisk = http://{{ ironic_http_interface_address }}:{{ ironic_http_port }}/ironic-agent.initramfs
rescue_kernel = http://{{ ironic_http_interface_address }}:{{ ironic_http_port }}/ironic-agent.kernel
rescue_ramdisk = http://{{ ironic_http_interface_address }}:{{ ironic_http_port }}/ironic-agent.initramfs
In the [conductor] section, we can specify the default kernel and ramdisk to use for system installation and recovery. The variables ironic_http_interface_address and ironic_http_port – whose names are sufficiently self-explanatory – will be expanded by Ansible with their respective values during the actual configuration file creation process.
2.7 OpenStack Deploy
Let’s check the configuration directory $KOLLA_CONFIG_PATH, which should contain the following files:
kolla@bms:~$ tree $KOLLA_CONFIG_PATH
/var/lib/kolla/etc
├── ansible
│   └── inventory
│   └── all-in-one
├── config
│   ├── ironic
│   │   ├── ironic-agent.initramfs
│   │   └── ironic-agent.kernel
│   └── ironic.conf
├── globals.yml
└── passwords.yml

5 directories, 6 files
globals.yml: YAML configuration file for OpenStack Kolla;passwords.yml: YAML with users and passwords used by the various components;ansible/inventory/all-in-one: Default Ansible inventory;config/ironic.conf: INI file containing specific configuration options for OpenStack Ironic;config/ironic/ironic-agent.{kernel,initramfs}: Binaries related to the Ironic Python Agent.
To pre-validate the configuration before the actual deployment, you can run the kolla-ansible validate-configcommand, and, if there are no errors to correct, finally proceed with the kolla-ansible deploy command:

NOTE: In case of errors, to get more debug information, you can increase the “verbosity” of the Ansible messages by re-running the command with a proportional number of “-v” options (e.g., kolla-ansible deploy -vvv).
Upon completion of the deployment, various containers will be active: some are service containers, others are specific to OpenStack Ironic:
- kolla_toolbox: This is a management “proxy” container.
- cron: Used to execute scheduled batch actions (e.g., logrotate).
- mariadb[tcp/3306]: Database for OpenStack’s persistent data.
- rabbitmq[tcp/5672]: Message queue used to track transactional or stateful activities.
- ironic_conductor: Ironic’s business logic.
- ironic_api[tcp/6385]: RESTful API front-end (Bare Metal API).
- ironic_tftp[udp/69]: Trivial FTP (FTP over UDP) used to provide kernel and ramdisk via PXE.
- ironic_http[tcp/8089]: HTTP repository.
- ironic_dnsmasq[udp/67]: DHCP server.
kolla@bms:~$ sudo podman container ps -a
CONTAINER ID  IMAGE                        CREATED        STATUS                      NAMES
978e287862b4  kolla-toolbox:2025.1         5 minutes ago  Up 5 minutes ago            kolla_toolbox
6d0150fa51e2  cron:2025.1                  5 minutes ago  Up 5 minutes ago            cron
a9df741f70c6  mariadb-clustercheck:2025.1  4 minutes ago  Up 4 minutes ago            mariadb_clustercheck
e222e740d7ce  mariadb-server:2025.1        4 minutes ago  Up 4 minutes ago (healthy)  mariadb
efe4ebcce42c  rabbitmq:2025.1              4 minutes ago  Up 4 minutes ago (healthy)  rabbitmq
fd7169161d76  ironic-conductor:2025.1      3 minutes ago  Up 3 minutes ago (healthy)  ironic_conductor
040e1ae3254e  ironic-api:2025.1            3 minutes ago  Up 3 minutes ago (healthy)  ironic_api
6a3956ff2c25  ironic-pxe:2025.1            3 minutes ago  Up 3 minutes ago            ironic_tftp
26f5c058b419  ironic-pxe:2025.1            3 minutes ago  Up 3 minutes ago (healthy)  ironic_http
be427175421b  dnsmasq:2025.1               3 minutes ago  Up 3 minutes ago            ironic_dnsmasq
The definitive configuration for the various components in question can be found in the /etc/kolla directory, which is only accessible with root privileges:
kolla@bms:~$ sudo tree /etc/kolla/etc/kolla
├── cron
│   ├── config.json
│   └── logrotate.conf
├── ironic-api
│   ├── config.json
│   ├── ironic-api-wsgi.conf
│   └── ironic.conf
├── ironic-conductor
│   ├── config.json
│   └── ironic.conf
├── ironic-dnsmasq
│   ├── config.json
│   └── dnsmasq.conf
├── ironic-http
│   ├── config.json
│   ├── httpd.conf
│   ├── inspector.ipxe
│   ├── ironic-agent.initramfs
│   └── ironic-agent.kernel
├── ironic-tftp
│   └── config.json
├── kolla-toolbox
│   ├── config.json
│   ├── erl_inetrc
│   ├── rabbitmq-env.conf
│   └── rabbitmq-erlang.cookie
├── mariadb
│   ├── config.json
│   └── galera.cnf
├── mariadb-clustercheck
│   └── config.json
└── rabbitmq
    ├── advanced.config
    ├── config.json
    ├── definitions.json
    ├── enabled_plugins
    ├── erl_inetrc
    ├── rabbitmq.conf
    └── rabbitmq-env.conf

11 directories, 29 files
This consists of the default OpenStack Kolla configurations combined with the specific variations from files located in the config folder under the directory identified by the $KOLLA_CONFIG_PATH variable. In this lab, that’s /var/lib/kolla/etc/config, though by default it would be /etc/kolla/config (Kolla’s Deployment Philosophy).
Alternatively, the directory hosting the customized configuration files can be defined within the globals.yml file by setting the node_custom_config variable (OpenStack Service Configuration in Kolla).
NOTE: These configuration files can be generated independently of the deployment process using the kolla-ansible genconfig command.
To check if the Ironic service is up and running, we can directly query the API with the command curl http://172.19.74.1:6385 | yq -y:
name: OpenStack Ironic API
description: Ironic is an OpenStack project which enables the provision and management
  of baremetal machines.
default_version:
  id: v1
  links:
    - href: http://172.19.74.1:6385/v1/
      rel: self
  status: CURRENT
  min_version: '1.1'
  version: '1.96'
versions:
  - id: v1
    links:
      - href: http://172.19.74.1:6385/v1/
        rel: self
    status: CURRENT
    min_version: '1.1'
    version: '1.96'
Let’s also test the client via the command line:
kolla@bms:~$ openstack \
  --os-endpoint=http://172.19.74.1:6385 \
  --os-auth-type=none \
  baremetal driver list
+---------------------+----------------+
| Supported driver(s) | Active host(s) |
+---------------------+----------------+
| ipmi                | bms            |
| redfish             | bms            |
+---------------------+----------------+

kolla@bms:~$ openstack \
  --os-endpoint=http://172.19.74.1:6385 \
  --os-auth-type=none \
  baremetal conductor list
+----------------+-----------------+-------+
| Hostname.      | Conductor Group | Alive |
+----------------+-----------------+-------+
| bms            |                 | True  |
+----------------+-----------------+-------+

kolla@bms:~$ openstack \
  --os-endpoint=http://172.19.74.1:6385 \
  --os-auth-type=none \
  baremetal conductor show bms
+-----------------+---------------------------+
| Field           | Value                     |
+-----------------+---------------------------+
| created_at      | 2025-03-31T17:50:26+00:00 |
| updated_at      | 2025-04-01T17:16:56+00:00 |
| hostname        | bms                       |
| conductor_group |                           |
| drivers         | ['ipmi', 'redfish']       |
| alive           | True                      |
+-----------------+---------------------------+
As a second option, you can replace the --os-endpoint and --auth-type parameters with the OS_ENDPOINT and OS_AUTH_TYPE environment variables:
kolla@bms:~$ export OS_ENDPOINT=http://172.19.74.1:6385/

kolla@bms:~$ export OS_AUTH_TYPE=none

kolla@bms:~$ openstack baremetal driver show ipmi -f yaml | grep ^def
default_bios_interface: no-bios
default_boot_interface: ipxe
default_console_interface: no-console
default_deploy_interface: direct
default_firmware_interface: no-firmware
default_inspect_interface: agent
default_management_interface: ipmitool
default_network_interface: noop
default_power_interface: ipmitool
default_raid_interface: no-raid
default_rescue_interface: agent
default_storage_interface: noop
default_vendor_interface: ipmitool

kolla@bms:~$ openstack baremetal driver show redfish -f yaml | grep ^def
default_bios_interface: no-bios
default_boot_interface: ipxe
default_console_interface: no-console
default_deploy_interface: direct
default_firmware_interface: no-firmware
default_inspect_interface: agent
default_management_interface: redfish
default_network_interface: noop
default_power_interface: redfish
default_raid_interface: redfish
default_rescue_interface: agent
default_storage_interface: noop
default_vendor_interface: redfish
Alternatively, OpenStack clients use a file named clouds.yaml in the following filesystem locations, in a specific order:
- Current directory
~/.config/openstackdirectory/etc/openstackdirectory
kolla@bms:~$ mkdir -p ~/.config/openstack

kolla@bms:~$ cat >~/.config/openstack/clouds.yaml <<-EOF
clouds:
  ironic-standalone:
    endpoint: http://172.19.74.1:6385
    auth_type: none
EOF
NOTE: If there are multiple configurations within the clouds.yaml file, it is necessary to specify the relevant entry using the --os-cloud command-line option (e.g., openstack --os-cloud=ironic …) or through the OS_CLOUD environment variable (e.g., export OS_CLOUD=ironic).
For more information, consult the following link: Configuring os-client-config Applications.
To Be Continued…
Check out Part Two to finish the setup.
- Part Two: Getting Started with Standalone OpenStack Ironic - June 30, 2025
- Part One: Getting Started with Standalone OpenStack Ironic - June 23, 2025

)


