)
Managing physical servers as if they were Virtual Machines in a Cloud environment? Infrastructure-as-Code and CI/CD Pipelines with physical nodes? Let’s try to demystify some preconceptions about Private Cloud infrastructures and Bare Metal Lifecycle with practical, simple, and reproducible examples, starting with a minimal OpenStack Ironic “standalone” setup.
In our first post, we started to talk about bare metal lifecycle management by introducing OpenStack Ironic in a “standalone” configuration.
We laid the groundwork for our lab environment, detailing the minimal setup for the Bare Metal Service (bms) server, including the installation of Podman and the configuration of OpenStack Kolla Ansible. We covered the necessary steps to prepare the environment, install the Ironic Python Agent (IPA), and perform the initial OpenStack deployment.
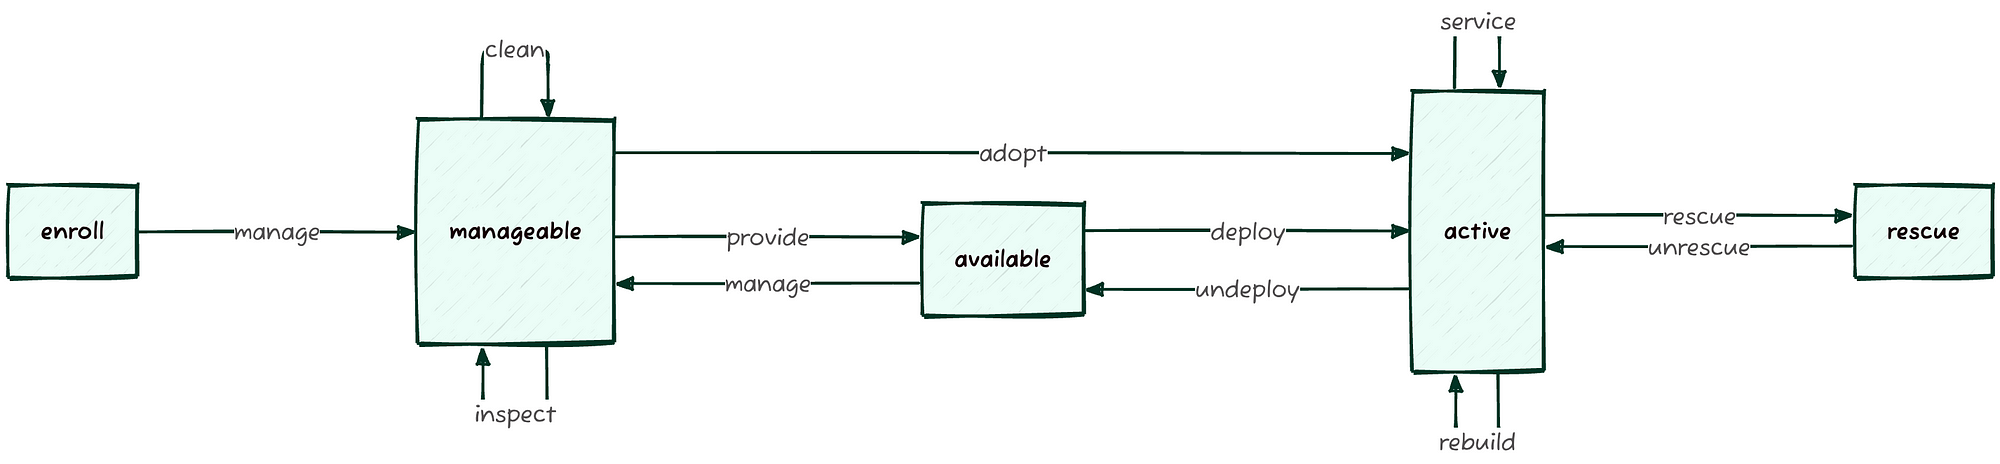
3 Bare Metal Management
- Configuring the BMCs of the servers to be managed;
- Onboarding nodes;
- Inspecting nodes;
- Cleaning (optional);
- Deployment;
- Recovering an inaccessible node.
3.1 BMC Configuration
For Ironic to manage physical nodes, the various BMCs (Baseboard Management Controllers) must be accessible from the bms server via the OOB/IB network 172.19.74.0/24. (For the lab, a single LAN network, 192.168.0.0/24, where all services collapse, is also acceptable) with their respective access credentials.
The Ethernet card dedicated to operating system installation and in-band management must be PXE-boot enabled via the BIOS.
On many servers, the BMC’s MAC address and access credentials are listed on a dedicated label.
Let’s gather the information for the servers to be managed in a convenient location:
| Server | BMC address | BMC type | BMC user | BMC pass | PXE MAC address |
|---|---|---|---|---|---|
| server01 | 172.19.74.201 | redfish | ironic | baremetal | 9c:b6:54:b2:b0:ca |
| server02 | 172.19.74.202 | ipmi | ironic | baremetal | dc:f4:01:ec:7c:c4 |
| server03 | 172.19.74.203 | redfish | ironic | baremetal | 9c:b6:54:3a:55:10 |
To check if the BMCs are accessible via IPMI and/or Redfish protocols, let’s install the respective command-line tools:
kolla@bms:~$ sudo apt install ipmitool redfishtool
...

kolla@bms:~$ redfishtool -r 172.19.74.201 -u ironic -p baremetal Systems
{
  "@odata.context": "/redfish/v1/$metadata#Systems",
  "@odata.id": "/redfish/v1/Systems/",
  "@odata.type": "#ComputerSystemCollection.ComputerSystemCollection",
  "Description": "Computer Systems view",
  "Members": [
    {
      "@odata.id": "/redfish/v1/Systems/1/"
    }
  ],
  "[email protected]": 1,
  "Name": "Computer Systems"
}

kolla@bms:~$ ipmitool -C 3 -I lanplus -H 172.19.74.202 \
  -U ironic -P baremetal chassis status
System Power : off
Power Overload : false
Power Interlock : inactive
Main Power Fault : false
Power Control Fault : false
Power Restore Policy : previous
Last Power Event :
Chassis Intrusion : inactive
Front-Panel Lockout : inactive
Drive Fault : false
Cooling/Fan Fault : false
Front Panel Control : none
NOTE: On some BMCs, using IPMI and Redfish protocols might require explicit enablement within the BIOS settings.
The enrollment phase occurs when a new server is onboarded and managed by Ironic using the command openstack baremetal node create --driver ....
The information required to proceed is:
- BMC type (e.g., ipmi, redfish, ilo, idrac, etc.)
- BMC IP address with its corresponding credentials (out-of-band)
- MAC address of the network card that will be used for inspection, installation, and potential recovery (in-band)
kolla@bms:~$ openstack baremetal node create \
  --name server01 --driver redfish \
  --driver-info redfish_address=https://172.19.74.201 \
  --driver-info redfish_verify_ca=False \
  --driver-info redfish_username=ironic \
  --driver-info redfish_password=baremetal \
  -f value -c uuid
5113ab44-faf2-4f76-bb41-ea8b14b7aa92

kolla@bms:~$ openstack baremetal node create \
  --name server02 --driver ipmi \
  --driver-info ipmi_address=172.19.74.202 \
  --driver-info ipmi_username=ironic \
  --driver-info ipmi_password=baremetal \
  -f value -c uuid
5294ec18-0dae-449e-913e-24a0638af8e5

kolla@bms:~$ openstack baremetal node list
+--------------------------------------+----------+---------------+-------------+--------------------+-------------+
| UUID                                 | Name     | Instance UUID | Power State | Provisioning State | Maintenance |
+--------------------------------------+----------+---------------+-------------+--------------------+-------------+
| 5113ab44-faf2-4f76-bb41-ea8b14b7aa92 | server01 | None          | None        | enroll             | False       |
| 5294ec18-0dae-449e-913e-24a0638af8e5 | server02 | None          | None        | enroll             | False       |
+--------------------------------------+----------+---------------+-------------+--------------------+-------------+
To manage the servers, they must be declared manageable using the command openstack baremetal node manage ...:

Ironic will use the specified hardware driver (in this case, redfish) to query the BMC and will transition from the enrollstate to verifying, and finally to manageable, populating some server properties that can be queried with the command openstack baremetal node show <UUID|NAME> -f value -c properties.
kolla@bms:~$ openstack baremetal node manage server01

kolla@bms:~$ openstack baremetal node list
+--------------------------------------+----------+---------------+-------------+--------------------+-------------+
| UUID                                 | Name     | Instance UUID | Power State | Provisioning State | Maintenance |
+--------------------------------------+----------+---------------+-------------+--------------------+-------------+
| 5113ab44-faf2-4f76-bb41-ea8b14b7aa92 | server01 | None          | power off   | verifying          | False       |
| 5294ec18-0dae-449e-913e-24a0638af8e5 | server02 | None          | None        | enroll             | False       |
+--------------------------------------+----------+---------------+-------------+--------------------+-------------+

kolla@bms:~$ openstack baremetal node list
+--------------------------------------+----------+---------------+-------------+--------------------+-------------+
| UUID                                 | Name     | Instance UUID | Power State | Provisioning State | Maintenance |
+--------------------------------------+----------+---------------+-------------+--------------------+-------------+
| 5113ab44-faf2-4f76-bb41-ea8b14b7aa92 | server01 | None          | power off   | manageable         | False       |
| 5294ec18-0dae-449e-913e-24a0638af8e5 | server02 | None          | None        | enroll             | False       |
+--------------------------------------+----------+---------------+-------------+--------------------+-------------+

kolla@bms:~$ openstack baremetal node show server01 -f value -c properties
{'vendor': 'HPE'}
NOTE: Unfortunately, in this case, it’s not possible to use the “canonical” name (e.g., server01); you must explicitly use its corresponding UUID.
3.3 Inspection
The “inspection” process in OpenStack Ironic is used to automatically catalog the hardware characteristics of a bare metal server.
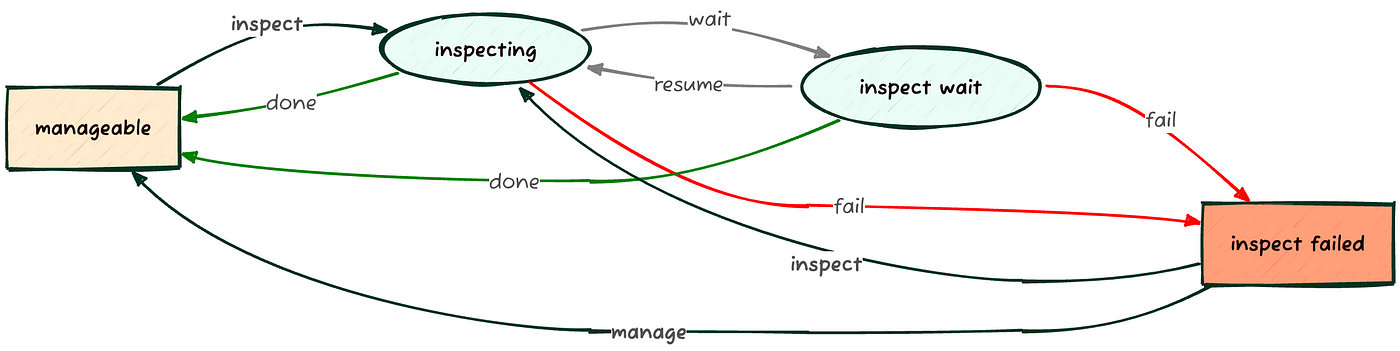
This process allows us to gather various useful pieces of information, such as disks, CPU type, RAM, and network cards, before the actual installation. This data can then be used to guide and customize the installation itself.
kolla@bms:~$ time openstack baremetal node inspect server01 --wait
Waiting for provision state manageable on node(s) server01

real 6m26.435s
user 0m1.213s
sys 0m0.073s
With the node inventory thus generated, you can inspect the node using the command openstack baremetal node inventory save <UUID|NAME>, which returns a JSON collection. To make it easier to interpret, it’s advisable to use the jq or yq command:
kolla@bms:~$ openstack baremetal node inventory save server01 | \
  yq -r 'keys[]'
inventory
plugin_data

kolla@bms:~$ openstack baremetal node inventory save server01 | \
  yq -r '.inventory|keys[]'
bmc_address
bmc_mac
bmc_v6address
boot
cpu
disks
hostname
interfaces
memory
system_vendor

kolla@bms:~$ openstack baremetal node inventory save server01 | \
  yq -y '.inventory.system_vendor'
product_name: ProLiant ML350 Gen9 (776971-035)
serial_number: CZ24421875
manufacturer: HP
firmware:
vendor: HP
version: P92
build_date: 08/29/2024

kolla@bms:~$ openstack baremetal node inventory save server01 | \
  yq -y '.inventory.boot'
current_boot_mode: uefi
pxe_interface: 9c:b6:54:b2:b0:ca
To list the network cards and their characteristics, we could filter the output using the command yq -y '.inventory.interfaces', or even filter only the network cards that have a connected link (has_carrier==true):
kolla@bms:~$ openstack baremetal node inventory save server01 | \
  yq -y '.inventory.interfaces|map_values(select(.has_carrier==true))'
- name: eno1
  mac_address: 9c:b6:54:b2:b0:ca
  ipv4_address: 172.19.74.193
  ipv6_address: fe80::9eb6:54ff:feb2:b0ca%eno1
  has_carrier: true
  lldp: null
  vendor: '0x14e4'
  product: '0x1657'
  client_id: null
  biosdevname: null
  speed_mbps: 1000
  pci_address: '0000:02:00.0'
  driver: tg3
- name: eno2
  mac_address: 9c:b6:54:b2:b0:cb
  ipv4_address: 192.168.0.195
  ipv6_address: fe80::9eb6:54ff:feb2:b0cb%eno2
  has_carrier: true
  lldp: null
  vendor: '0x14e4'
  product: '0x1657'
  client_id: null
  biosdevname: null
  speed_mbps: 1000
  pci_address: '0000:02:00.1'
  driver: tg3
With this information, you can choose the best candidate disk on which to install the operating system. To specify the use of disk /dev/sdc, which is the SanDisk Ultra Fit of approximately 30GB with serial 4C530001220528100484, you can set the root_device property:
kolla@bms:~$ openstack baremetal node set server01 \
  --property root_device='{"serial": "4C530001220528100484"}'

kolla@bms:~$ openstack baremetal node show server01 -f json | \
  yq -y '.properties'
vendor: HPE
cpu_arch: x86_64
root_device:
  serial: 4C530001220528100484
3.4 Cleaning (Optional)
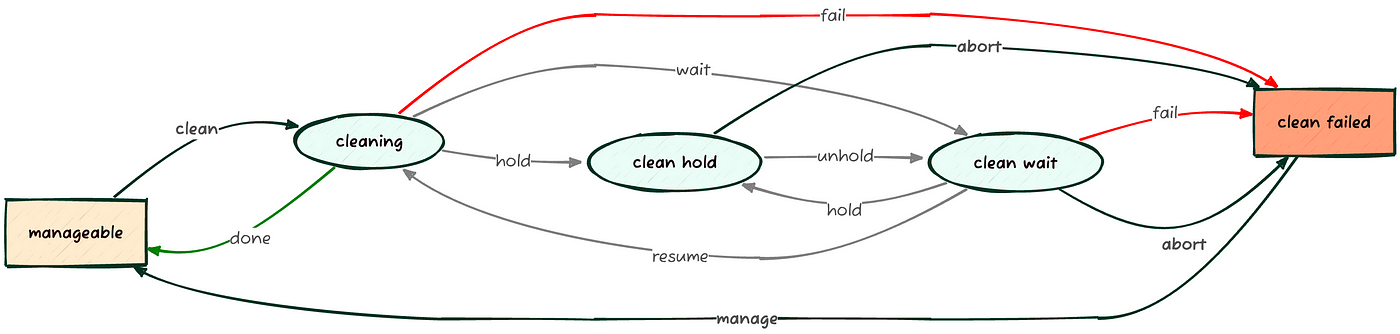
If the hardware isn’t new, the disks might contain sensitive data or, worse, conflict with the new deployment (e.g., a previous operating system installed on a disk other than the intended destination).
To prevent these situations, it’s useful to use the node cleaning functionality provided by Ironic via the agent with the command openstack baremetal node clean <UUID>:
kolla@bms:~$ openstack baremetal node clean server01 \
  --clean-steps '[{"interface": "deploy", "step": "erase_devices_metadata"}]'
The mandatory option --clean-steps is used to specify actions through a particular interface from the following: power, management, deploy, firmware, bios, and raid.
For the deploy interface, which is managed via the Ironic Python Agent (IPA), the available steps are:
erase_devices: Ensures data is wiped from disks.erase_devices_metadata: Wipes only disk metadata.erase_devices_express: Hardware-assisted data wiping, currently only supported by NVMe.
NOTE: For all other “cleaning” options, which we’ll skip for now (e.g., firmware upgrades, BIOS reset, RAID setup, etc.), you can refer to the Node Cleaning chapter in the Ironic documentation.
3.5 Deployment
Now that we’ve added, analyzed, and configured the systems to be managed (openstack baremetal node [create|manage|inspect|clean]), we’ll have a list of nodes in a manageable state:
kolla@bms:~$ openstack baremetal node list
+--------------------------------------+----------+---------------+-------------+--------------------+-------------+
| UUID                                 | Name     | Instance UUID | Power State | Provisioning State | Maintenance |
+--------------------------------------+----------+---------------+-------------+--------------------+-------------+
| 5113ab44-faf2-4f76-bb41-ea8b14b7aa92 | server01 | None          | power off   | manageable         | False       |
| 5294ec18-0dae-449e-913e-24a0638af8e5 | server02 | None          | power off   | manageable         | False       |
| f0d3f50a-d543-4e3d-9b9a-ba719373ab58 | server03 | None          | power off   | manageable         | False       |
+--------------------------------------+----------+---------------+-------------+--------------------+-------------+
To make a physical node available for deployment, you need to declare it as available:

Any node in a manageable state is eligible to become available via the openstack baremetal node provide <UUID|NAME> command. The inverse operation is performed with openstack baremetal node manage <UUID|NAME>.
kolla@bms:~$ openstack baremetal node provide server01

kolla@bms:~$ openstack baremetal node list
+--------------------------------------+----------+---------------+-------------+--------------------+-------------+
| UUID                                 | Name     | Instance UUID | Power State | Provisioning State | Maintenance |
+--------------------------------------+----------+---------------+-------------+--------------------+-------------+
| 5113ab44-faf2-4f76-bb41-ea8b14b7aa92 | server01 | None          | power off   | available          | False       |
| 5294ec18-0dae-449e-913e-24a0638af8e5 | server02 | None          | power off   | manageable         | False       |
| f0d3f50a-d543-4e3d-9b9a-ba719373ab58 | server03 | None          | power off   | manageable         | False       |
+--------------------------------------+----------+---------------+-------------+--------------------+-------------+

kolla@bms:~$ openstack baremetal node validate server01
+------------+--------+------------------------------------------------------------------------------------------------+
| Interface  | Result | Reason                                                                                         |
+------------+--------+------------------------------------------------------------------------------------------------+
| bios       | False  | Driver redfish does not support bios (disabled or not implemented).                            |
| boot       | True   |                                                                                                |
| console    | False  | Driver redfish does not support console (disabled or not implemented).                         |
| deploy     | False  | Node 5113ab44-faf2-4f76-bb41-ea8b14b7aa92 failed to validate deploy image info. Some           |
|            |        | parameters were missing. Missing are: ['instance_info.image_source']                           |
| firmware   | False  | Driver redfish does not support firmware (disabled or not implemented).                        |
| inspect    | True   |                                                                                                |
| management | True   |                                                                                                |
| network    | True   |                                                                                                |
| power      | True   |                                                                                                |
| raid       | True   |                                                                                                |
| rescue     | False  | Node 5113ab44-faf2-4f76-bb41-ea8b14b7aa92 is missing 'instance_info/rescue_password'. It is    |
|            |        | required for rescuing node.                                                                    |
| storage    | True   |                                                                                                |
+------------+--------+------------------------------------------------------------------------------------------------+
We can perform a final check on the node to be installed using the openstack baremetal node validate <UUID|NAME>command (output shown above). The result indicates that some areas aren’t managed (False value):
- bios: In this case, the functionality was explicitly disabled with
enabled_bios_interfaces = no-bios. - console: This functionality is also disabled (
enabled_console_interfaces = no-console). - deploy: The
image_sourceparameter is missing, which specifies where to get the operating system image to install. - firmware: Functionality disabled (
enabled_firmware_interfaces = no-firmware). - rescue: The
rescue_passwordparameter is missing.
Without a surrounding Cloud environment, Ironic needs to know where to get the image to install, either directly via a file or a URL. The image_source parameter, in the --instance-info section of the openstack baremetal node setcommand, indicates exactly this.
Although it’s possible to use a URL on the Internet, for bandwidth optimization, it’s preferable to use a local repository. In this case, we’ll use the web server in the ironic_http container and the persistent ironic volume mounted to it:
kolla@bms:~$ sudo podman volume inspect ironic
[
    {
        "Name": "ironic",
        "Driver": "local",
        "Mountpoint": "/var/lib/containers/storage/volumes/ironic/_data",
        "CreatedAt": "2025-04-02T18:28:15.831223385+02:00",
        "Labels": {},
        "Scope": "local",
        "Options": {},
        "MountCount": 0,
        "NeedsCopyUp": true
    }
]

kolla@bms:~$ sudo podman container inspect ironic_http | \
  yq '.[]|.Mounts[]|select(.Name=="ironic")'
{
  "Type": "volume",
  "Name": "ironic",
  "Source": "/var/lib/containers/storage/volumes/ironic/_data",
  "Destination": "/var/lib/ironic",
  "Driver": "local",
  "Mode": "",
  "Options": [
    "nosuid",
    "nodev",
    "rbind"
  ],
  "RW": true,
  "Propagation": "rprivate"
}

kolla@bms:~$ sudo cat /etc/kolla/ironic-http/httpd.conf
Listen 172.19.74.1:8089

TraceEnable off

<VirtualHost *:8089>
    LogLevel warn
    ErrorLog "/var/log/kolla/ironic/ironic-http-error.log"
    LogFormat "%h %l %u %t \"%r\" %>s %b %D \"%{Referer}i\" \"%{User-Agent}i\"" logformat
    CustomLog "/var/log/kolla/ironic/ironic-http-access.log" logformat
    DocumentRoot "/var/lib/ironic/httpboot"
    <Directory /var/lib/ironic/httpboot>
        Options FollowSymLinks
        AllowOverride None
        Require all granted
    </Directory>
</VirtualHost>
Since the volume /var/lib/containers/storage/volumes/ironic/_data is mounted under /var/lib/ironic in the ironic_http container and exposes the /var/lib/ironic/httpboot directory (DocumentRoot) via http://172.19.74.1:8089 (Listen), we can copy the various operating system images in raw or qcow2 format to the directory /var/lib/containers/storage/volumes/ironic/_data/httpboot/<IMAGE> and reference them as http://172.19.74.1:8089/<IMAGE>:
kolla@bms:~$ sudo wget \
  -P /var/lib/containers/storage/volumes/ironic/_data/httpboot/ \
  https://cloud.debian.org/images/cloud/bookworm/latest/debian-12-nocloud-amd64.qcow2
...
debian-12-nocloud-amd64.qcow2 100%[========================================>] 398.39M

kolla@bms:~$ sudo wget \
  -P /var/lib/containers/storage/volumes/ironic/_data/httpboot/ \
  https://cloud.debian.org/images/cloud/bookworm/latest/debian-12-generic-amd64.qcow2
...
debian-12-generic-amd64.qcow2 100%[========================================>] 422.45M

kolla@bms:~$ sudo podman exec --workdir=/var/lib/ironic/httpboot \
  ironic_http sh -c 'sha256sum *.qcow2 >CHECKSUM'

kolla@bms:~$ sudo podman exec ironic_http ls -la /var/lib/ironic/httpboot
total 1202312
drwxr-xr-x 3 ironic ironic      4096 May 28 14:34 .
drwxr-xr-x 8 ironic ironic       162 Apr 14 15:17 ..
-rw-r--r-- 1 ironic ironic      1004 Apr  2 18:28 boot.ipxe
-rw-r--r-- 1 root   root         192 May 28 14:27 CHECKSUM
-rw-r--r-- 1 ironic ironic   4843992 Apr 11 16:18 cp042886.exe
-rw-r--r-- 1 root   root   442970624 May 19 23:34 debian-12-generic-amd64.qcow2
-rw-r--r-- 1 root   root   417746432 May 19 23:50 debian-12-nocloud-amd64.qcow2
-rw-r--r-- 1 ironic ironic   8388608 May 27 17:37 esp.img
-rw-r--r-- 1 root   root         533 May 27 17:40 inspector.ipxe
-rw-r--r-- 1 root   root   348999425 May 27 17:40 ironic-agent.initramfs
-rw-r--r-- 1 root   root     8193984 May 27 17:40 ironic-agent.kernel
drwxr-xr-x 2 ironic ironic         6 May 28 14:34 pxelinux.cfg

kolla@bms:~$ curl -I http://172.19.74.1:8089/debian-12-nocloud-amd64.qcow2
HTTP/1.1 200 OK
Date: Wed, 28 May 2025 10:46:31 GMT
Server: Apache/2.4.62 (Debian)
Last-Modified: Mon, 19 May 2025 21:50:09 GMT
ETag: "18e64e00-635841d9c4640"
Accept-Ranges: bytes
Content-Length: 417746432
NOTE: Creating the CHECKSUM file is necessary to allow Ironic to verify that the image has not been altered during the transfer process from the source server to the bare metal node.
We’re ready to perform the first test deployment:
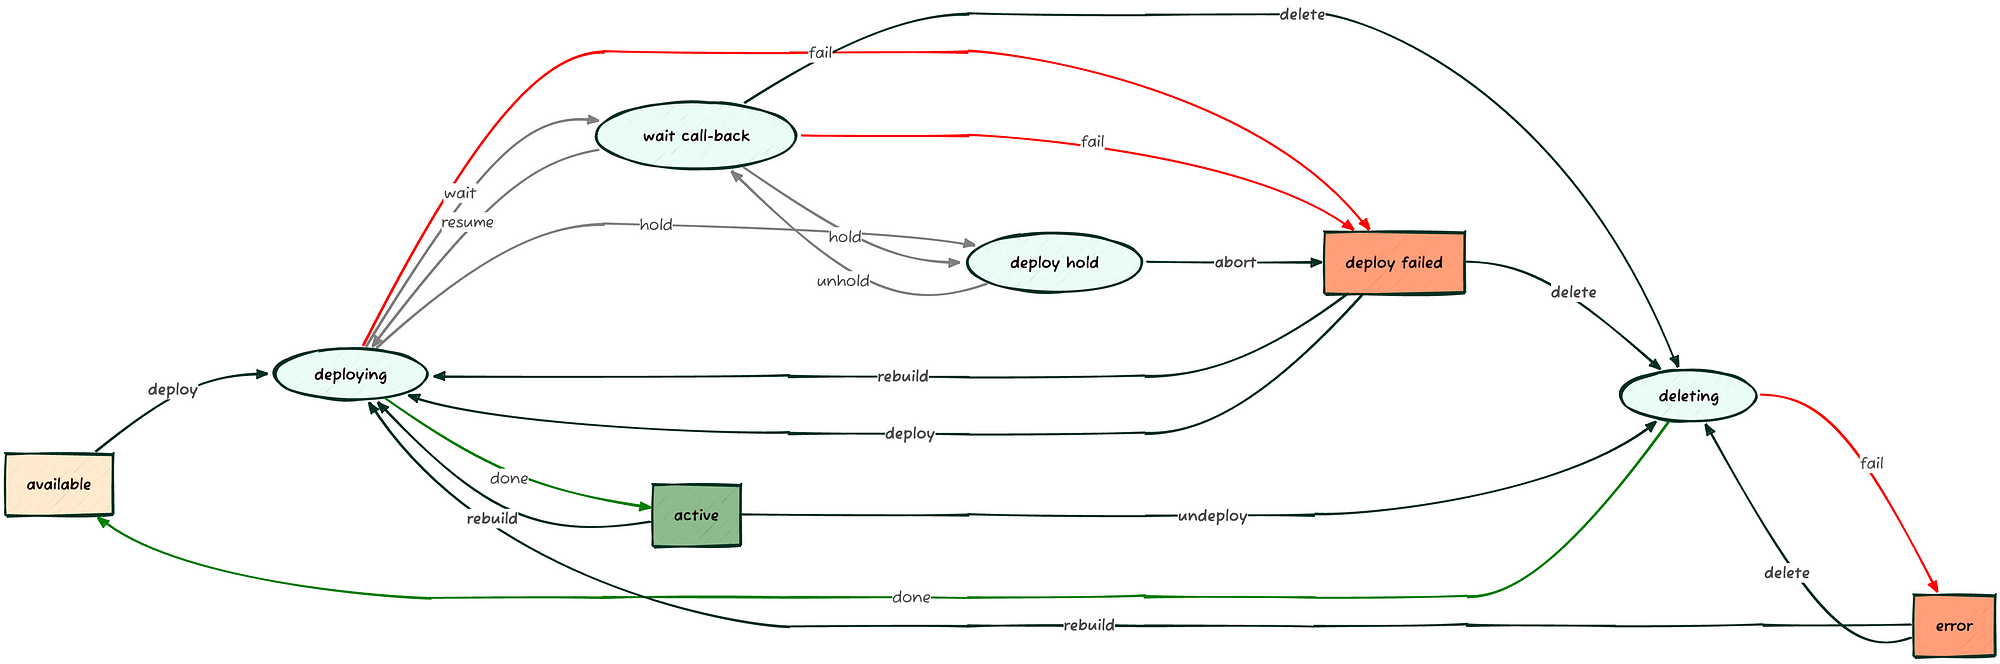
3.5.1 Test
As a first test, we can use the Debian Cloud image named “nocloud,” referenced as debian-12-nocloud-amd64.qcow2, to certify that the process works. Unfortunately, this image doesn’t have cloud-init installed, and it only allows root access directly from the console without a password, as the SSH service isn’t active.
kolla@bms:~$ openstack baremetal node set server01 \
  --instance-info image_source=http://172.19.74.1:8089/debian-12-nocloud-amd64.qcow2 \
  --instance-info image_checksum=http://172.19.74.1:8089/CHECKSUM

kolla@bms:~$ openstack baremetal node deploy server01

kolla@bms:~$ openstack baremetal node list
+--------------------------------------+----------+---------------+-------------+--------------------+-------------+
| UUID                                 | Name     | Instance UUID | Power State | Provisioning State | Maintenance |
+--------------------------------------+----------+---------------+-------------+--------------------+-------------+
| 5113ab44-faf2-4f76-bb41-ea8b14b7aa92 | server01 | None          | power on    | wait call-back     | False       |
| 5294ec18-0dae-449e-913e-24a0638af8e5 | server02 | None          | power off   | manageable         | False       |
| f0d3f50a-d543-4e3d-9b9a-ba719373ab58 | server03 | None          | power off   | manageable         | False       |
+--------------------------------------+----------+---------------+-------------+--------------------+-------------+

kolla@bms:~$ openstack baremetal node list
+--------------------------------------+----------+---------------+-------------+--------------------+-------------+
| UUID                                 | Name     | Instance UUID | Power State | Provisioning State | Maintenance |
+--------------------------------------+----------+---------------+-------------+--------------------+-------------+
| 5113ab44-faf2-4f76-bb41-ea8b14b7aa92 | server01 | None          | power on    | deploying          | False       |
| 5294ec18-0dae-449e-913e-24a0638af8e5 | server02 | None          | power off   | manageable         | False       |
| f0d3f50a-d543-4e3d-9b9a-ba719373ab58 | server03 | None          | power off   | manageable         | False       |
+--------------------------------------+----------+---------------+-------------+--------------------+-------------+

kolla@bms:~$ openstack baremetal node list
+--------------------------------------+----------+---------------+-------------+--------------------+-------------+
| UUID                                 | Name     | Instance UUID | Power State | Provisioning State | Maintenance |
+--------------------------------------+----------+---------------+-------------+--------------------+-------------+
| 5113ab44-faf2-4f76-bb41-ea8b14b7aa92 | server01 | None          | power on    | active             | False       |
| 5294ec18-0dae-449e-913e-24a0638af8e5 | server02 | None          | power off   | manageable         | False       |
| f0d3f50a-d543-4e3d-9b9a-ba719373ab58 | server03 | None          | power off   | manageable         | False       |
+--------------------------------------+----------+---------------+-------------+--------------------+-------------+
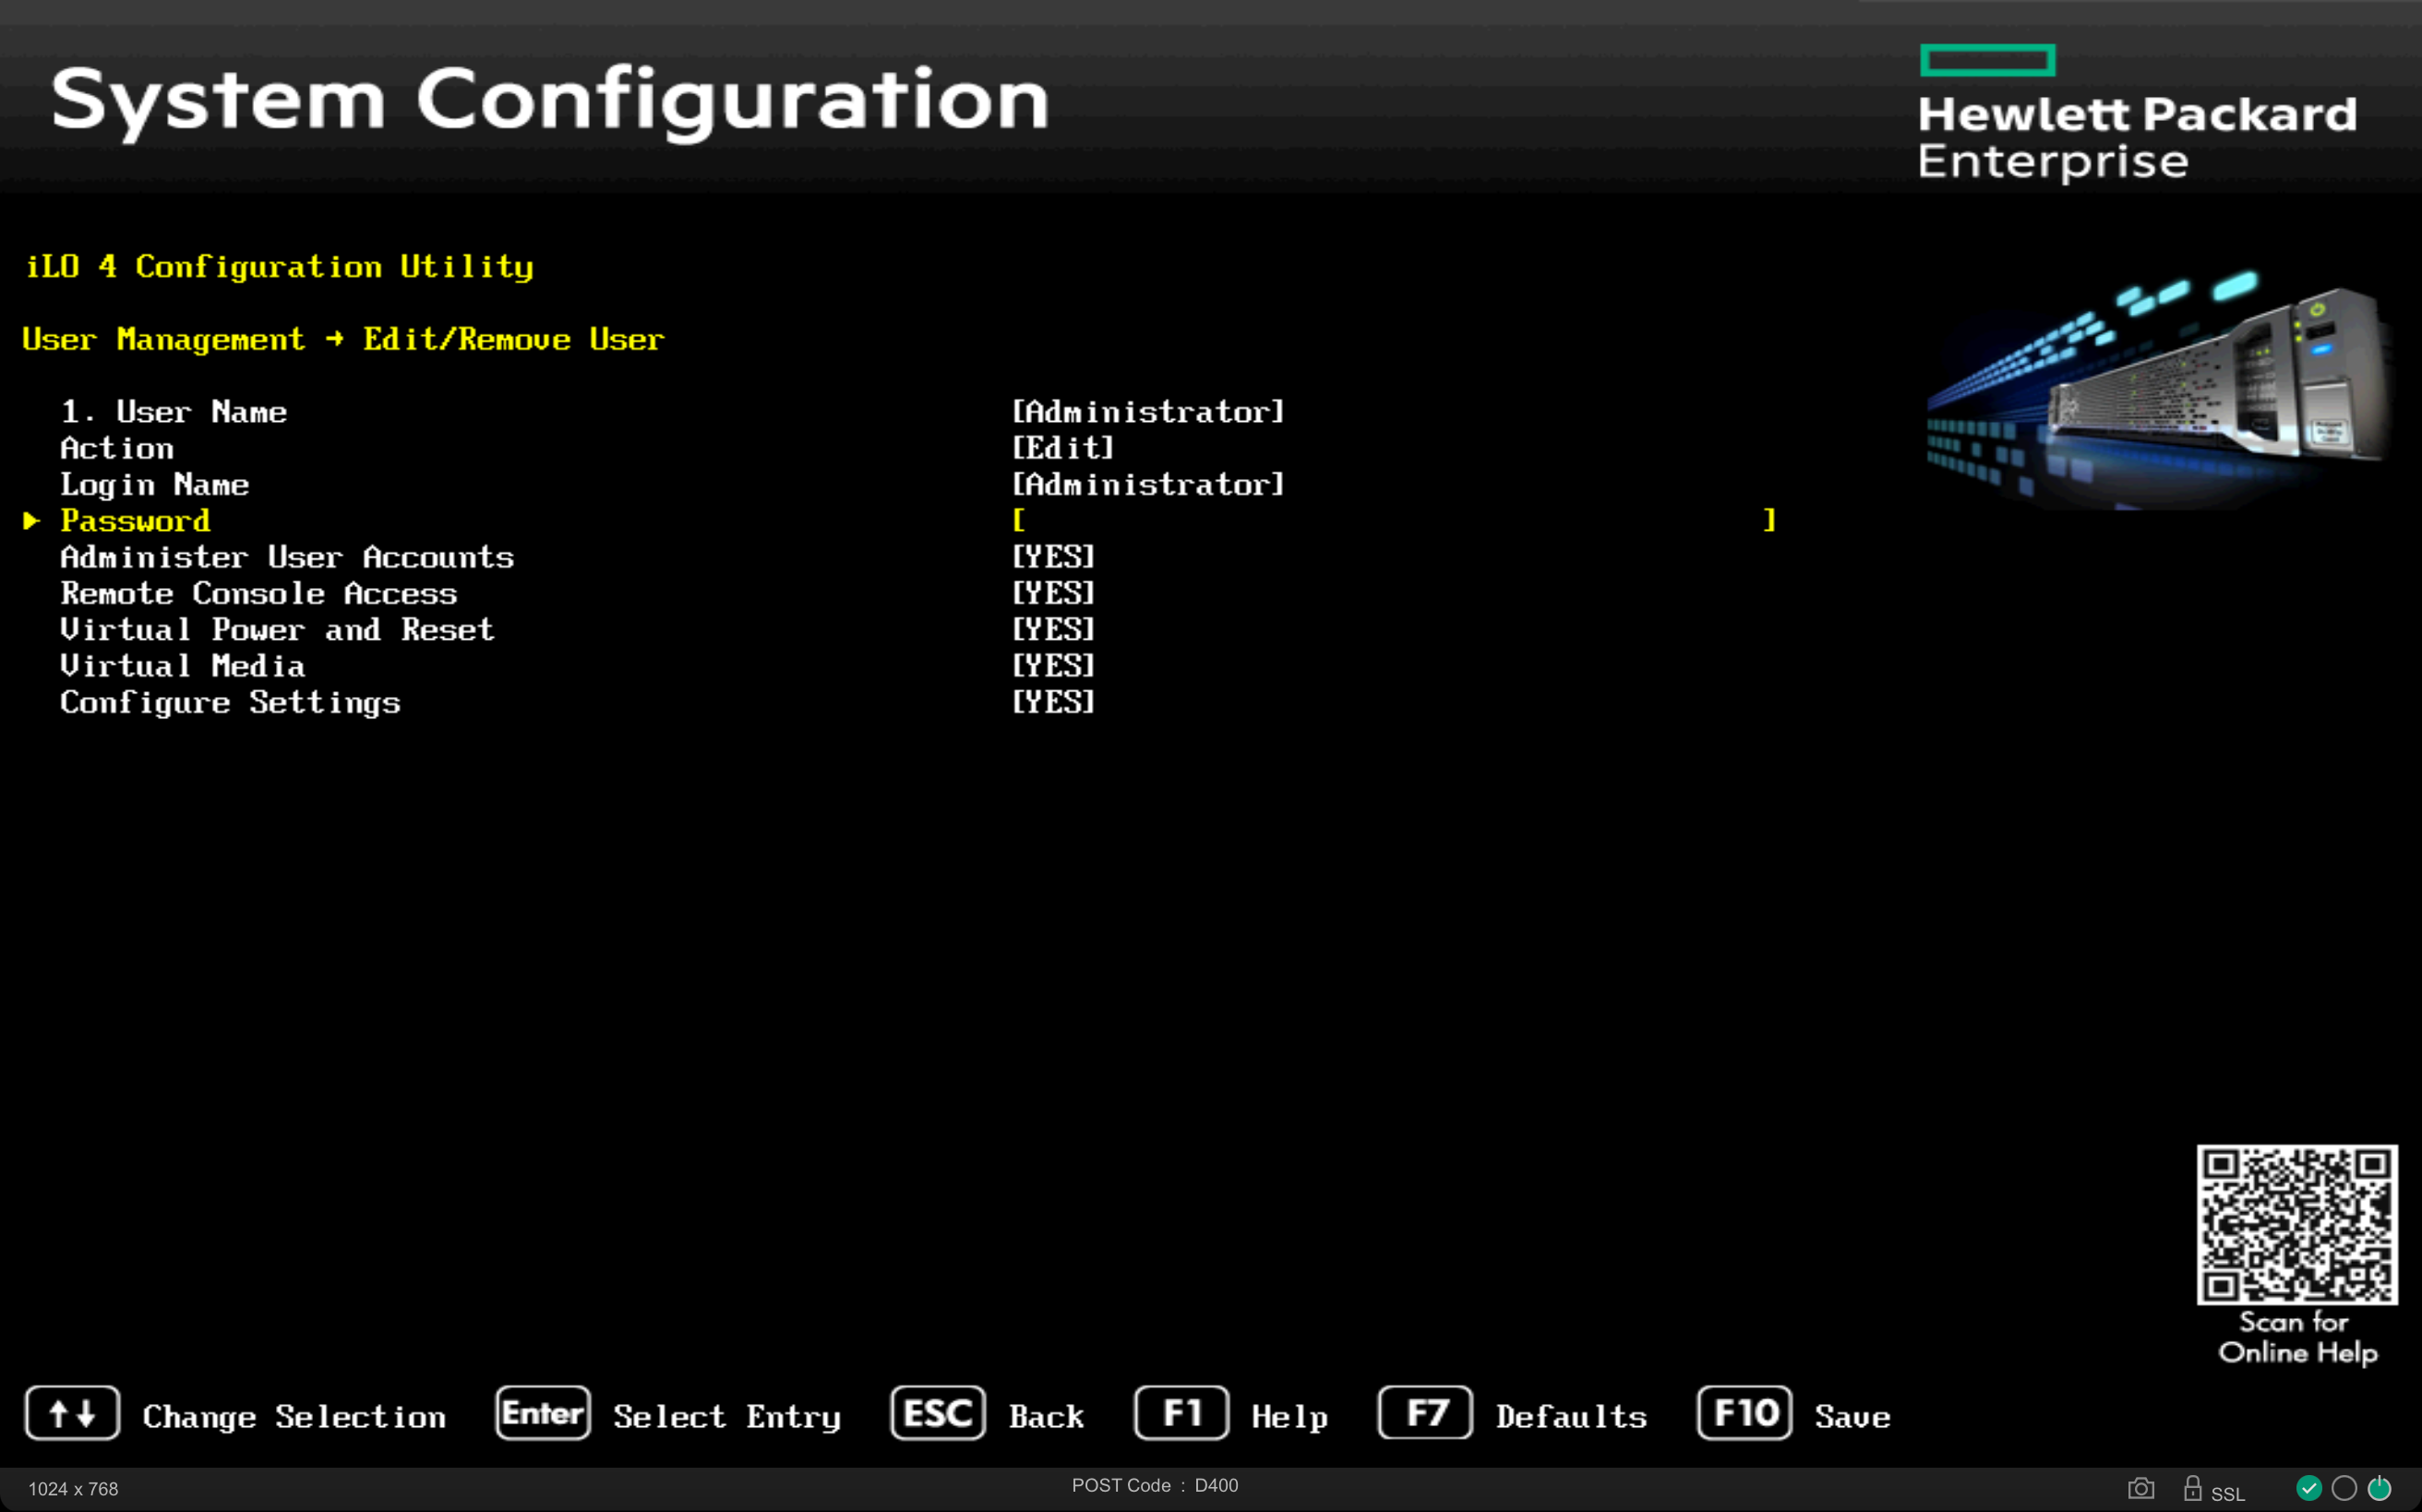
Upon completion of the process, when the Provisioning State of the node in question becomes active, we can verify the outcome directly from the server’s console or via its BMC:
To decommission this test instance:
kolla@bms:~$ openstack baremetal node undeploy server01

kolla@bms:~$ openstack baremetal node list
+--------------------------------------+----------+---------------+-------------+--------------------+-------------+
| UUID                                 | Name     | Instance UUID | Power State | Provisioning State | Maintenance |
+--------------------------------------+----------+---------------+-------------+--------------------+-------------+
| 5113ab44-faf2-4f76-bb41-ea8b14b7aa92 | server01 | None          | power on    | deleting           | False       |
| 5294ec18-0dae-449e-913e-24a0638af8e5 | server02 | None          | power off   | manageable         | False       |
| f0d3f50a-d543-4e3d-9b9a-ba719373ab58 | server03 | None          | power off   | manageable         | False       |
+--------------------------------------+----------+---------------+-------------+--------------------+-------------+

kolla@bms:~$ openstack baremetal node list
+--------------------------------------+----------+---------------+-------------+--------------------+-------------+
| UUID                                 | Name     | Instance UUID | Power State | Provisioning State | Maintenance |
+--------------------------------------+----------+---------------+-------------+--------------------+-------------+
| 5113ab44-faf2-4f76-bb41-ea8b14b7aa92 | server01 | None          | power off   | available          | False       |
| 5294ec18-0dae-449e-913e-24a0638af8e5 | server02 | None          | power off   | manageable         | False       |
| f0d3f50a-d543-4e3d-9b9a-ba719373ab58 | server03 | None          | power off   | manageable         | False       |
+--------------------------------------+----------+---------------+-------------+--------------------+-------------+
The node will be powered off, and its Provisioning State will transition from active to deleting, and then back to available.
3.5.2 cloud-init
Static images, like the previous debian-12-nocloud, don’t provide configuration flexibility. Unless an image is specifically crafted to meet your needs (partitioning, networking, users, software, etc.), they tend to be of limited use.
We can achieve a compromise by using images that include cloud-init:
“Cloud images are OS templates and every instance starts as an identical clone of every other instance. It is the user data that gives each distinct cloud instance its personality, and cloud-init is the tool which applies user data to instances automatically.” (ref. https://cloud-init.io)
To provide personalization instructions to the bare metal node, we’ll use a portion of the node’s own disk, known as a Config Drive. During deployment, necessary information will be downloaded to this Config Drive in the form of structured files within a filesystem.
Assuming we want to install the server01 node with the following characteristics:
ironicuser with a pre-installed public SSH key andsudoprivileges to execute root commands;- Software to be automatically installed:
gitandpodman; - Network interface on the LAN configured with a static IP address
192.168.0.11/24, default gateway, and public DNS;
we can proceed as follows:
kolla@bms:~$ ssh-keygen
Generating public/private rsa key pair.
Enter file in which to save the key (/home/kolla/.ssh/id_rsa):
Enter passphrase (empty for no passphrase):
Enter same passphrase again:
...

kolla@bms:~$ RSA_PUB=$(cat ~/.ssh/id_rsa.pub)

kolla@bms:~$ NODE=server01

kolla@bms:~$ mkdir -p ~/ConfigDrive/$NODE/openstack/latest

kolla@bms:~$ cat >~/ConfigDrive/$NODE/openstack/latest/meta_data.json <<EOF
{
  "uuid": "$(openstack baremetal node show $NODE -f value -c uuid)",
  "hostname": "$NODE"
}
EOF

kolla@bms:~$ cat >~/ConfigDrive/$NODE/openstack/latest/user_data <<EOF
#cloud-config
package_update: true
packages:
- git
- podman
users:
- name: ironic
  shell: /bin/bash
  sudo: ["ALL=(ALL) NOPASSWD:ALL"]
  ssh_authorized_keys:
  - '$RSA_PUB'
EOF

kolla@bms:~$ cat >~/ConfigDrive/$NODE/openstack/latest/network_data.json <<EOF
{
  "links": [
    {
      "id": "oob0",
      "type": "phy",
      "ethernet_mac_address": "9c:b6:54:b2:b0:ca"
    },
    {
      "id": "lan0",
      "type": "phy",
      "ethernet_mac_address": "9c:b6:54:b2:b0:cb"
    }
  ],
  "networks": [
    {
      "id": "oob",
      "type": "ipv4_dhcp",
      "link": "oob0",
      "network_id": "oob"
    },
    {
      "id": "lan",
      "type": "ipv4",
      "link": "lan0",
      "ip_address": "192.168.0.11/24",
      "gateway": "192.168.0.254",
      "network_id": "lan"
    }
  ],
  "services": [
    {
      "type": "dns",
      "address": "8.8.8.8"
    },
    {
      "type": "dns",
      "address": "8.8.4.4"
    }
  ]
}
EOF
NOTE: For more information on the structure of the network_data.json file, refer to its schema: https://opendev.org/openstack/nova/src/branch/master/doc/api_schemas/network_data.json
To perform a new deployment leveraging cloud-init, we change the reference image_source to debian-12-generic-amd64.qcow2 and specify the directory containing the files to generate the Config Drive:
kolla@bms:~$ openstack baremetal node set server01 \
  --instance-info image_source=http://172.19.74.1:8089/debian-12-generic-amd64.qcow2 \
  --instance-info image_checksum=http://172.19.74.1:8089/CHECKSUM

kolla@bms:~$ time openstack baremetal node deploy server01 \
  --config-drive=$HOME/ConfigDrive/server01 --wait
Waiting for provision state active on node(s) server01

real 12m3.542s
user 0m0.863s
sys 0m0.085s
NOTE: If we hadn’t already deleted the previous deployment with the openstack baremetal node undeploy <UUID|NAME> command, it’s still possible to reset the image_source variable using openstack baremetal node set <UUID|NAME> --instance-info image_source=... and then request a rebuild: openstack baremetal node rebuild <UUID|NAME> --config-drive=<PATH>.
3.6 Recovering an Inaccessible Node (rescue)
Sometimes things go wrong… the IPA (Ironic Python Agent) loads, the operating system seems to write correctly to disk, and the Config Drive appears installed. Yet the node doesn’t boot, or maybe it boots, but the network card doesn’t configure, the admin user credentials seem incorrect, an error message flashes too quickly on the server monitor… in short, Murphy is always ready to contribute.
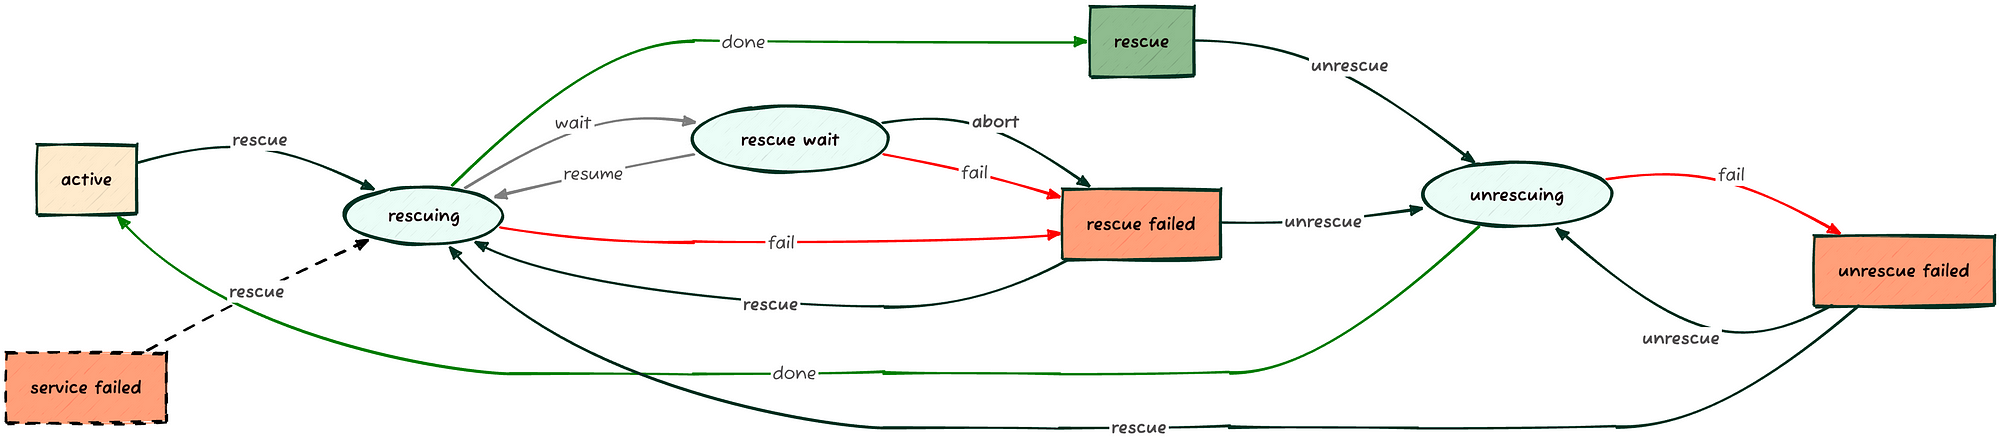
To leverage the IPA as a recovery system, the node must be in the active state and can be invoked with the following command:
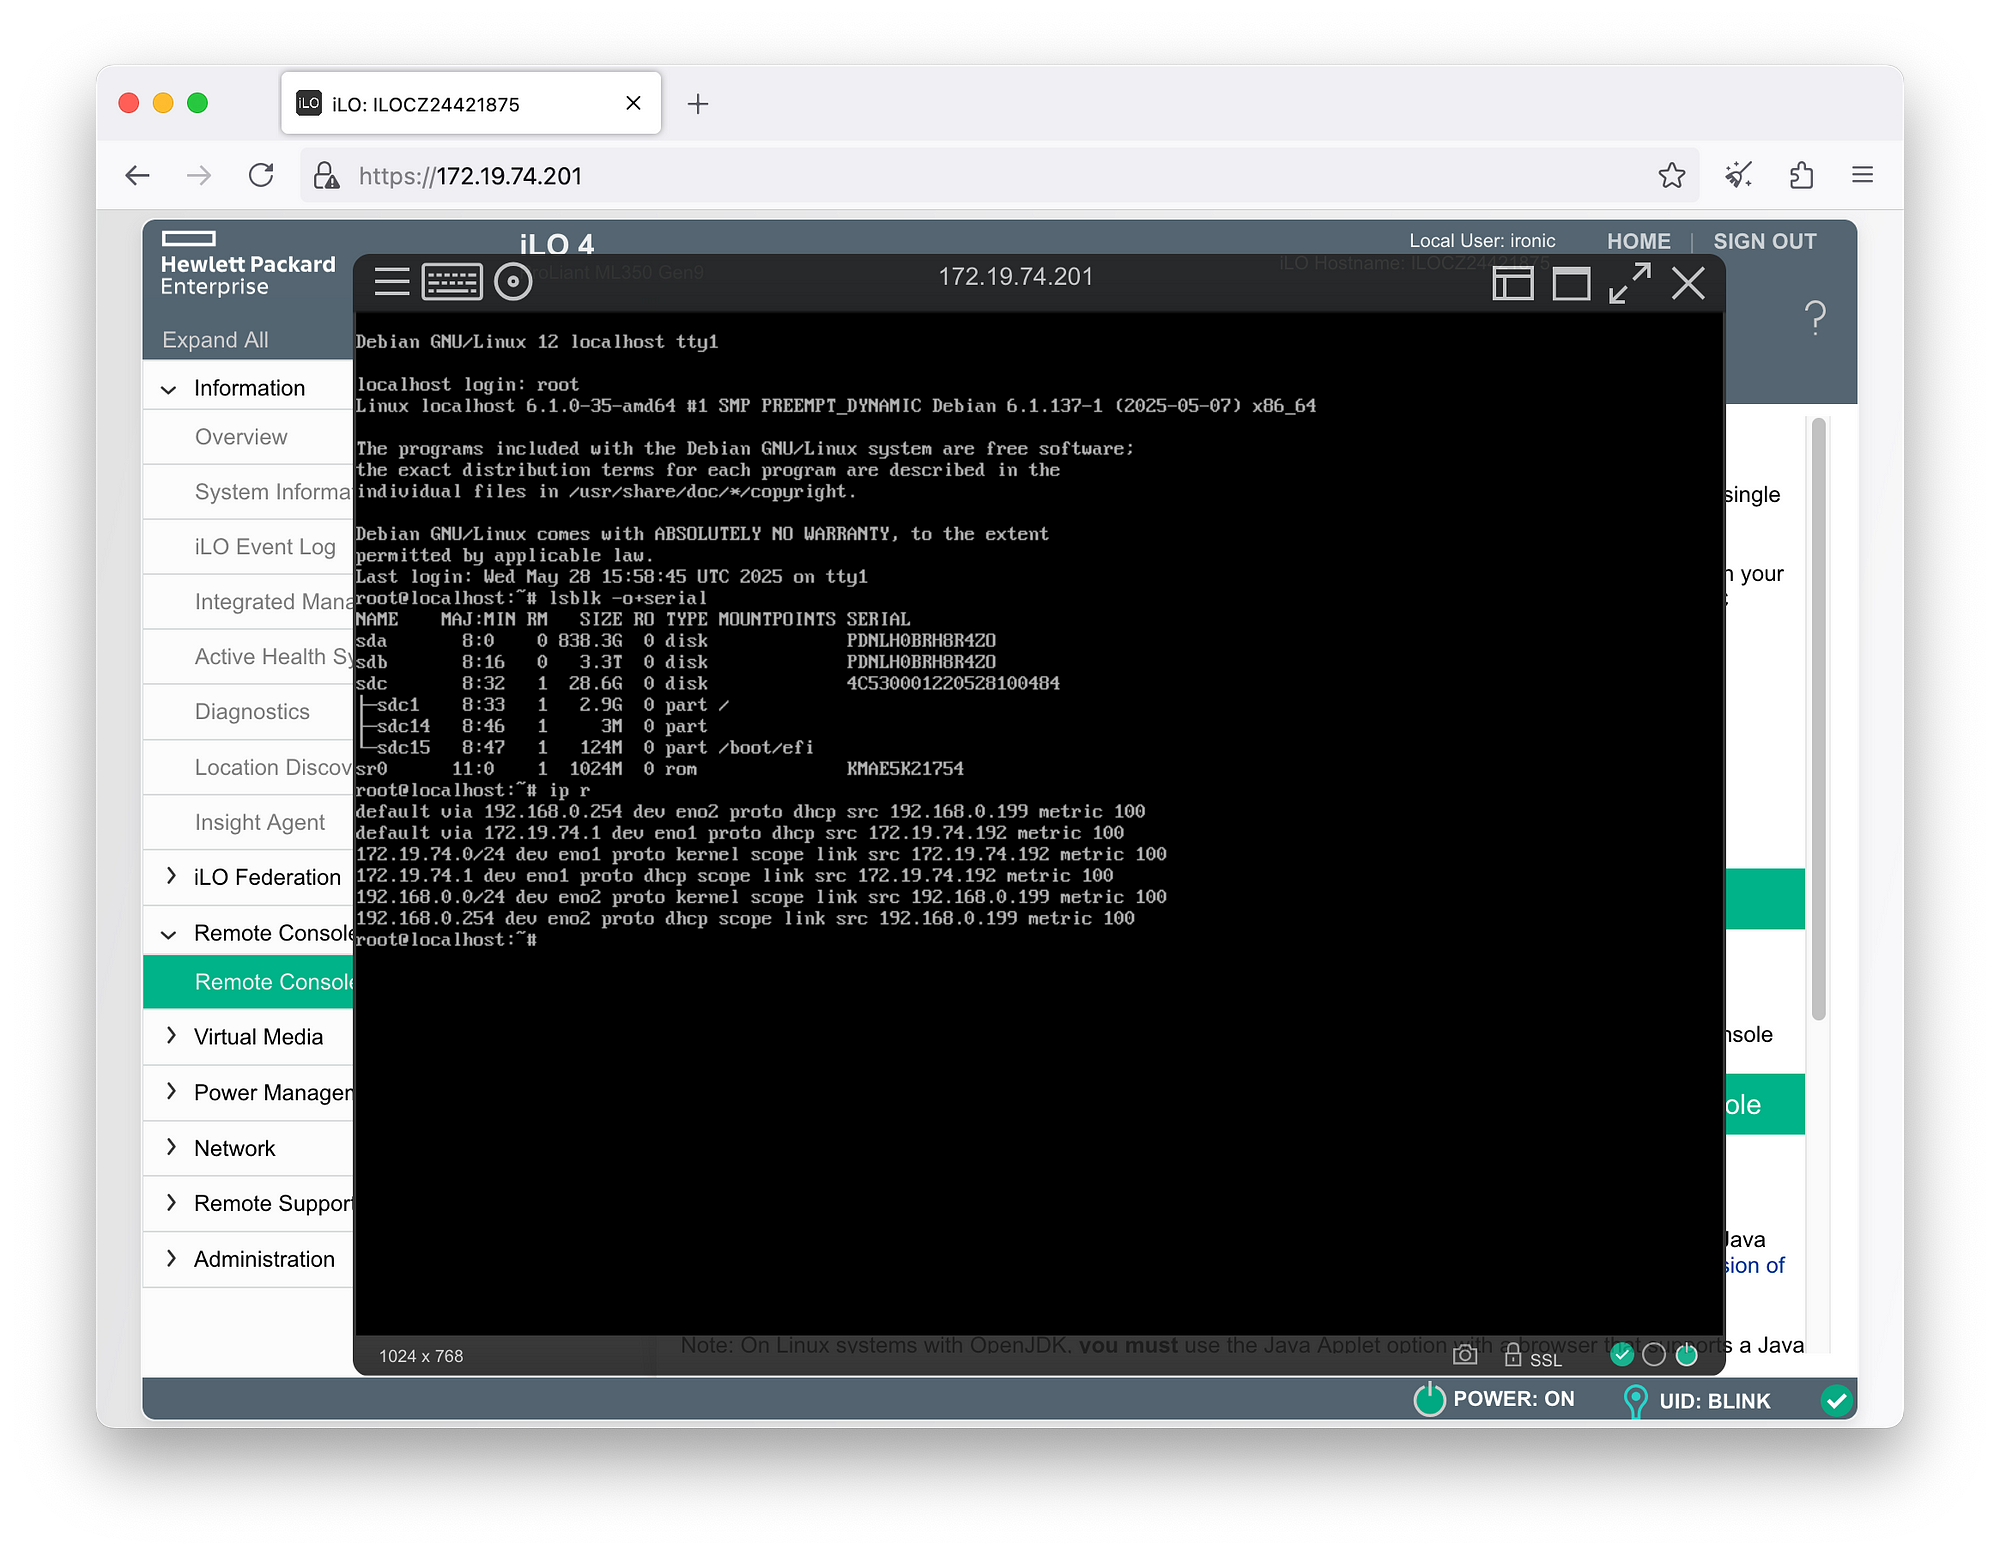
kolla@bms:~$ openstack baremetal node show server01 -c provision_state
+-----------------+--------+
| Field           | Value  |
+-----------------+--------+
| provision_state | active |
+-----------------+--------+

kolla@bms:~$ time baremetal node rescue server01 \
  --rescue-password=<PASSWORD> --wait
Waiting for provision state rescue on node(s) server01

real 5m42.284s
user 0m0.745s
sys 0m0.045s

kolla@bms:~$ openstack baremetal node show server01 -c provision_state
+-----------------+--------+
| Field           | Value  |
+-----------------+--------+
| provision_state | rescue |
+-----------------+--------+
We can identify the assigned IP address from the DHCP server logs of Ironic (which consists of a container running dnsmasq), starting from the MAC address of the network card used for deployment:
kolla@bms:~$ openstack baremetal port list -f value -c address \
  --node $(openstack baremetal node show server01 -f value -c uuid)
9c:b6:54:b2:b0:ca

kolla@bms:~$ sudo grep -i 9c:b6:54:b2:b0:ca /var/log/kolla/ironic/dnsmasq.log | tail -1
May 31 11:13:58 dnsmasq-dhcp[2]: DHCPACK(enp2s0) 172.19.74.192 9c:b6:54:b2:b0:ca
And finally, connect with the rescue user and the previously defined password to analyze the disk content, system and cloud-init logs, etc.:
kolla@bms:~$ ssh [email protected]
...

[rescue@localhost ~]$ sudo -i

[root@localhost ~]# lsblk -o+fstype,label
NAME    MAJ:MIN RM   SIZE RO TYPE MOUNTPOINTS FSTYPE LABEL
sda       8:0    0   3.3T  0 disk
sdb.      8:16   1  28.6G  0 disk
|-sdb1    8:17   1  28.5G  0 part             ext4
|-sdb2    8:18   1  64.4M  0 part             iso9660 config-2
|-sdb14   8:30   1     3M  0 part
`-sdb15   8:31   1   124M  0 part             vfat
sdc       8:32   0 838.3G  0 disk
sr0      11:0    1  1024M  0 rom

[root@localhost ~]# mount /dev/sdb1 /mnt

[root@localhost ~]# mount --bind /dev /mnt/dev

[root@localhost ~]# mount --bind /sys /mnt/sys

[root@localhost ~]# mount --bind /proc /mnt/proc

[root@localhost ~]# chroot /mnt

root@localhost:/# journalctl --list-boots
IDX BOOT ID                          FIRST ENTRY                 LAST ENTRY
  0 34c9893dd3ab4a928207f7da41ec1226 Tue 2025-06-03 10:31:39 UTC Tue 2025-06-03 12:17:50 UTC

root@localhost:/# journalctl -b 34c9893dd3ab4a928207f7da41ec1226
...

root@localhost:/# less /var/log/cloud-init.log
...
To check how the Config Drive was written:
[root@localhost ~]# mount -r LABEL=config-2 /media

[root@localhost ~]# find /media
/media
/media/openstack
/media/openstack/latest
/media/openstack/latest/meta_data.json
/media/openstack/latest/network_data.json
/media/openstack/latest/user_data

[root@localhost ~]# cat /media/openstack/latest/meta_data.json
{
  "uuid": "5113ab44-faf2-4f76-bb41-ea8b14b7aa92",
  "hostname": "server01"
}

[root@localhost ~]# cat /media/openstack/latest/user_data
#cloud-config
package_update: true
packages:
- git
- podman
users:
- name: ironic
  shell: /bin/bash
  sudo: ["ALL=(ALL) NOPASSWD:ALL"]
  ssh_authorized_keys:
- 'sha-rsa ...'

[root@localhost ~]# umount /media
NOTE: To exit the rescue state, DO NOT restart the system from within it (e.g., reboot, shutdown -r now, etc.); it would simply boot the operating system on the disk without changing the state in Ironic’s database. Instead, use the openstack baremetal node unrescue <UUID|NAME> command from the management server.
4 Automation and Infrastructure as Code
Infrastructure as Code (IaC) is an approach to IT infrastructure management where servers, networks, databases, and other components are defined and configured through code, rather than being created and managed manually. Infrastructure effectively becomes a set of declarative, versionable, and automatable files, allowing complex environments to be built in a repeatable, reliable, and scalable manner.
For demonstration purposes, among the hundreds of commercial and open-source projects addressing this topic, we will use two of the most well-known: Terraform and Ansible.
4.1 Terraform/OpenTofu
In this chapter, the main objective will be to reproduce the activities we’ve carried out so far on the command line to install the Debian 12 cloud image using Terraform/OpenTofu in the simplest and most straightforward way possible.
Terraform, developed by HashiCorp, is one of the most widely used tools for orchestrating cloud resources (AWS, Azure, GCP, OpenStack) and “traditional” environments (VMware, Proxmox, etc.). Its language allows for clearly and repeatably describing the resources needed for an infrastructure: servers, networks, DNS, firewalls, storage, and much more.
OpenTofu, born as a fork of Terraform after a license change by HashiCorp (recently acquired by IBM), fully maintains compatibility. Governed by the open-source community, its mission is to ensure that IaC remains open, accessible, and independent of commercial logic.
To install Terraform, follow the instructions at the following link: https://developer.hashicorp.com/terraform/install;
To install OpenTofu, run the command apt install -y tofu.
Let’s start by searching for a provider for OpenStack Ironic in their respective registries:
- Terraform: https://registry.terraform.io/browse/providers
- OpenTofu: https://search.opentofu.org/
We will find a common provider, supplied by Appkins Org and derived from the OpenShift project “Terraform provider for Ironic“: appkins-org/ironic.
Subsequently, in a directory specifically created to host Terraform/OpenTofu files, create a file named main.tf with the following content:
terraform {
  required_providers {
    ironic = {
      source = "appkins-org/ironic"
      version = "0.6.1"
    }
  }
}

provider "ironic" {
  url           = "http://172.19.74.1:6385/v1"
  auth_strategy = "noauth"
  microversion  = "1.96"
  timeout       = 900
}

resource "ironic_node_v1" "server01" {
  name = "server01"

  inspect   = true  # Perform inspection
  clean     = false # Do not clean the node
  available = true  # Make the node 'available'

  ports = [
    {
      "address"     = "9c:b6:54:b2:b0:ca"
      "pxe_enabled" = "true"
    },
  ]

  driver      = "redfish"
  driver_info = {
    "redfish_address"   = "https://172.19.74.201"
    "redfish_verify_ca" = "False"
    "redfish_username"  = "ironic"
    "redfish_password"  = "baremetal"
  }
}

resource "ironic_deployment" "server01" {
  node_uuid = ironic_node_v1.server01.id

  instance_info = {
    image_source   = "http://172.19.74.1:8089/debian-12-generic-amd64.qcow2"
    image_checksum = "http://172.19.74.1:8089/CHECKSUM"
  }

  metadata = {
    uuid     = ironic_node_v1.server01.id
    hostname = ironic_node_v1.server01.name
  }

  user_data = <<-EOT
#cloud-config
package_update: true
packages:
- git
- podman
users:
- name: ironic
  shell: /bin/bash
  sudo: ["ALL=(ALL) NOPASSWD:ALL"]
  ssh_authorized_keys:
  - 'ssh-rsa ...'
  EOT
}
In this file, besides specifying the appkins-org/ironic provider and its location, two resources are defined. The first, of type ironic_node_v1, represents the enrollment phase combined with the inspection phase. The second, of type ironic_deployment, will handle the deployment phase and the creation of the associated Config Drive.
To download the provider and its dependencies, simply call the Terraform/OpenTofu init procedure:
kolla@bms:~/TF$ terraform init
- OR -
kolla@bms:~/TF$ tofu init

Initializing the backend...

Initializing provider plugins...
- Finding appkins-org/ironic versions matching "0.6.1"...
- Installing appkins-org/ironic v0.6.1...
- Installed appkins-org/ironic v0.6.1...
...

Terraform/OpenTofu has been successfully initialized!
Meanwhile, to execute the actual deployment, you use the apply procedure:
kolla@bms:~/TF$ terraform apply
- OR -
kolla@bms:~/TF$ tofu apply
...
Plan: 2 to add, 0 to change, 0 to destroy.

Do you want to perform these actions?
  Terraform will perform the actions described above.
  Only 'yes' will be accepted to approve.

  Enter a value: yes

...
ironic_deployment.server01: Creation complete after 10m32s [id=12016c80-be15-48ed-9b55-af00911c66b5]

Apply complete! Resources: 2 added, 0 changed, 0 destroyed.
4.2 Ansible
In this chapter, the goal is to achieve a more complex deployment that includes not only operating system provisioning but also the installation of a container orchestration platform like Kubernetes in an all-in-one (single node) setup.
Ansible is an open-source automation platform renowned for its incredible simplicity and remarkable power. Unlike other automation tools, Ansible is agentless, meaning it doesn’t require any additional software installation on the nodes it manages.
That said, other automation systems can be equally valid or even more suitable for your environment, such as Chef, Juju, Puppet, or SaltStack, to name just a few.
4.2.1 Ansible Playbook
The playbook structure will be as follows:
kolla@bms:~$ tree Ansible
Ansible
├── config.yml
├── deploy.yml
├── group_vars
│   └── all.yml
└── roles
   ├── ironic
   │   └── tasks
   │   └── main.yml
   └── k8s-aio
      ├── defaults
      │   └── main.yml
      └── tasks
          ├── configure.yml
          ├── install.yml
          ├── main.yml
          └── prepare.yml

8 directories, 9 files
In the config.yml file, we can create a data structure representing the list of nodes (nodes: []) to provision, trying to adhere as closely as possible to the form required by Ironic (bmc, root_device, instance_info, network_data, etc.), while adding some extra information like ansible_host and ansible_roles:
# config.yml
---
user_data: |
  #cloud-config
  users:
  - name: {{ default_user }}
    lock_passwd: false
    sudo: ['ALL=(ALL) NOPASSWD:ALL']
    ssh_authorized_keys:
    - '{{ public_key }}'
  mounts:
  - ['swap', null]
nodes:
- name: server01
  ansible_host: "192.168.0.11"
  ansible_roles:
  - k8s-aio
  bmc:
    driver: redfish
    driver_info:
      redfish_address: "https://172.19.74.201"
      redfish_verify_ca: false
      redfish_username: "ironic"
      redfish_password: "baremetal"
  pxe:
    mac: "9c:b6:54:b2:b0:ca"
  root_device:
    serial: "4C530001220528100484"
  instance_info:
    image_source: "http://172.19.74.1:8089/debian-12-generic-amd64.qcow2"
    image_checksum: "http://172.19.74.1:8089/CHECKSUM"
  network_data:
    links:
    - id: "oob0"
      type: "phy"
      ethernet_mac_address: "9c:b6:54:b2:b0:ca"
    - id: "lan0"
      type: "phy"
      ethernet_mac_address: "9c:b6:54:b2:b0:cb"
    networks:
     - id: "oob"
       type: "ipv4_dhcp"
       link: "oob0"
       network_id: "oob"
     - id: "lan"
       type: "ipv4"
       link: "lan0"
       ip_address: "192.168.0.11"
       netmask: "255.255.255.0"
       gateway: "192.168.0.254"
       network_id: "lan"
    services:
      - type: "dns"
        address: "8.8.8.8"
      - type: "dns"
        address: "8.8.4.4"
NOTE: Although the ansible_host variable is redundant (as it can be derived from processing the network_datastructure), it’s preferable to keep it explicit to improve playbook readability and avoid complex JSON Queries. If you prefer not to duplicate the information, you would still need to specify which interface to use for the connection (e.g., ansible_link: "lan0") to enable the query.
As a workaround to dynamically configure individual nodes, we’ll place the list of Ansible roles to apply to each node within the ansible_roles variable, as defined in the deploy.yml playbook:
# deploy.yml
---
- hosts: localhost
  connection: local
  gather_facts: true
  tasks:
  - name: Provision baremetal nodes
    ansible.builtin.include_role:
      name: ironic
    loop: "{{ nodes }}"
    loop_control:
      loop_var: node

- hosts: ironic
  gather_facts: false
  tasks:
  - name: Wait for node to become reachable
    ansible.builtin.wait_for_connection:
  - name: Gather facts for first time
    ansible.builtin.setup:
  - name: Provision node {{ ansible_hostname }}
    ansible.builtin.include_role:
      name: "{{ role }}"
    loop: "{{ ansible_roles }}"
    loop_control:
      loop_var: role
You’ll notice two groups (under hosts: elements) on which actions will be performed:
localhost: Through this, we’ll control OpenStack Ironic via its API for each node defined in ourconfig.ymlconfiguration file.ironic: This is a dynamic group that will be formed as theironicrole from the first group completes the operating system deployment for a node.
4.2.2 The “ironic” Role
The ironic role (found in the roles/ironic subdirectory) includes the enrollment phase (using the openstack.cloud.baremetal_node module) and the actual deployment phase (using the openstack.cloud.baremetal_node_action module). It also handles adding the node itself to the ironic group in the inventory (using the ansible.builtin.add_host module):
# roles/ironic/tasks/main.yml
---
- name: "Enroll {{ node.name }}"
  register: baremetal_create
  openstack.cloud.baremetal_node:
    cloud: "ironic-standalone"
    driver: "{{ node.bmc.driver }}"
    driver_info: "{{ node.bmc.driver_info }}"
    name: "{{ node.name }}"
    uuid: "{{ node.uuid|default(omit) }}"
    nics:
    - mac: "{{ node.pxe.mac }}"
    properties:
      capabilities: "boot_option:local"
      root_device: "{{ node.root_device }}"
- name: "Deploy {{ node.name }}"
  when: baremetal_create is changed
  openstack.cloud.baremetal_node_action:
  cloud: "ironic-standalone"
  id: "{{ baremetal_create.node.id }}"
  timeout: 1800
  instance_info: "{{ node.instance_info }}"
  config_drive:
    meta_data:
      uuid: "{{ baremetal_create.node.id }}"
      hostname: "{{ node.name }}"
    user_data: "{{ cloud_config }}"
    network_data: "{{ node.network_data }}"
- name: "Add {{ node.name }} to inventory"
  ansible.builtin.add_host:
    name: "{{ node.name }}"
    groups: ironic
    ansible_host: "{{ node.ansible_host }}"
    ansible_user: "{{ default_user }}"
    ansible_ssh_extra_args: "-o StrictHostKeyChecking=no"
    ansible_roles: "{{ node.ansible_roles }}"
Each module within the Openstack.Cloud collection uses the connection parameters referenced by the cloud variable, found in the ~/.config/openstack/clouds.yaml file (as discussed in Chapter 2.6, OpenStack Ironic “Standalone” Configuration in part 1).
Alternatively, instead of using the cloud parameter, you can explicitly specify the connection parameters:
- name: ...
  openstack.cloud.baremetal_...:
  auth:
    endpoint: "http://172.19.74.1:6385"
  auth_type: None
  ...
NOTE: The additional parameters -o StrictHostKeyChecking=no are necessary due to the potential overlap of SSH server certificates generated randomly with each deployment (if you delete and then redeploy the same server with the same IP address, the SSH server certificate will not be identical).
The creation of the ironic system user and the prevention of swap area activation (as required by Kubernetes) are addressed through the use of user_data with the cloud_config variable defined in the previous config.yml file.
4.2.3 The “k8s-aio” Role
The k8s-aio role (in the roles/k8s-aio subdirectory) has been structured to reproduce the Kubernetes installation phases described in the official documentation (Bootstrapping clusters with kubeadm), in addition to the Flannel CNI and the Nginx ingress controller.
For each physical node requiring this role, the actions contained in prepare.yml and install.yml will be executed in succession with privileged user rights, and configure.yml will be executed as the ironic user:
# roles/k8s-aio/tasks/main.yml
---
- name: Prepare server
  ansible.builtin.include_tasks:
    file: prepare.yml
    apply:
      become: true
- name: Install Kubernetes
  ansible.builtin.include_tasks:
    file: install.yml
    apply:
      become: true
- name: Configure Kubernetes
  ansible.builtin.include_tasks:
    file: configure.yml
The prepare.yml file focuses on system requirements, such as kernel modules to load, network parameters, and necessary software packages:
# roles/k8s-aio/tasks/prepare.yml
---
- name: Enable Kernel modules
  community.general.modprobe:
    name: "{{ item }}"
    state: present
    persistent: present
  loop:
  - overlay
  - br_netfilter
- name: Setup networking stack
  ansible.posix.sysctl:
    name: "{{ item.name }}"
    value: "{{ item.value }}"
    sysctl_file: /etc/sysctl.d/kubernetes.conf
  loop:
  - name: net.bridge.bridge-nf-call-ip6tables
    value: 1
  - name: net.bridge.bridge-nf-call-iptables
    value: 1
  - name: net.ipv4.ip_forward
    value: 1
- name: Install dependencies
  ansible.builtin.apt:
    pkg:
    - apt-transport-https
    - ca-certificates
    - containerd
    - curl
    - gpg
    - reserialize
    update_cache: yes
The installation phase follows the rules described in the documentation, resulting in a single-node Kubernetes cluster that can respond via its standard APIs:
# roles/k8s-aio/tasks/install.yml
---
- name: Download the public key for Kubernetes repository
  ansible.builtin.shell: |
    curl -fsSL {{ k8s_pkgs_url }}/Release.key | \
    gpg --dearmor -o /etc/apt/keyrings/kubernetes.gpg
  args:
    creates: /etc/apt/keyrings/kubernetes.gpg
- name: Add Kubernetes APT repository
  ansible.builtin.apt_repository:
    repo: "deb [signed-by=/etc/apt/keyrings/kubernetes.gpg] {{ k8s_pkgs_url }} /"
    filename: kubernetes
    state: present
- name: Install Kubernetes packages
  ansible.builtin.apt:
    pkg:
    - jq
    - kubeadm
    - kubectl
    - kubelet
- name: Check SystemdCgroup in containerd
  register: systemd_cgroup
  ansible.builtin.shell:
    crictl info | \
    jq -r '.config.containerd.runtimes.runc.options.SystemdCgroup'
- name: Enable SystemdCgroup in containerd
  when: systemd_cgroup.stdout == "false"
  ansible.builtin.shell: |
    containerd config default | \
    reserialize toml2json | \
    jq '.plugins."io.containerd.grpc.v1.cri".containerd.runtimes.runc.options.SystemdCgroup=true' | \
    reserialize json2toml >/etc/containerd/config.toml
- name: Restart containerd service
  when: systemd_cgroup.stdout == "false"
  ansible.builtin.systemd_service:
    name: containerd.service
    state: restarted
- name: Pull the required Kubernetes images
  ansible.builtin.command:
    cmd: kubeadm config images pull
    creates: /etc/kubernetes/admin.conf
- name: Initialize Kubernetes
  ansible.builtin.command:
    cmd: kubeadm init --pod-network-cidr={{ k8s_network }} --control-plane-endpoint {{ ansible_host }}:6443
    creates: /etc/kubernetes/admin.conf
Finally, in the configuration phase, the non-administrative user completes the Kubernetes setup by installing Flannel and Ingress-Nginx:
# roles/k8s-aio/tasks/configure.yml
---
- name: Read /etc/kubernetes/admin.conf
  become: true
  register: kube_conf
  ansible.builtin.slurp:
    src: /etc/kubernetes/admin.conf
- name: Create ~/.kube
  ansible.builtin.file:
    path: ~/.kube
    state: directory
    mode: 0700
- name: Create ~/.kube/config
  ansible.builtin.copy:
    content: "{{ kube_conf['content']|b64decode }}"
    dest: "~/.kube/config"
    mode: 0600
- name: Install Flannel
  # https://github.com/flannel-io/flannel?tab=readme-ov-file#deploying-flannel-with-kubectl
  ansible.builtin.command:
    cmd: kubectl apply -f https://github.com/flannel-io/flannel/releases/latest/download/kube-flannel.yml
- name: Remove NoSchedule taint for control-plane
  failed_when: false
  ansible.builtin.command:
    cmd: kubectl taint nodes {{ ansible_hostname }} node-role.kubernetes.io/control-plane:NoSchedule-
- name: Install Ingress-Nginx Controller
  ansible.builtin.command:
    cmd: kubectl apply -f https://raw.githubusercontent.com/kubernetes/ingress-nginx/main/deploy/static/provider/cloud/deploy.yaml
Some default values for the k8s-aio role can be found in the roles/k8s-aio/defaults/main.yml file:
# roles/k8s-aio/defaults/main.yml
---
k8s_version: "1.33"
k8s_network: "10.244.0.0/16"
k8s_pkgs_url: "https://pkgs.k8s.io/core:/stable:/v{{ k8s_version }}/deb"
The playbook concludes with the global variables file, group_vars/all.yml, which contains the default value for the public SSH key, the default name of the user to create, the content of the user_data, and the initialization of the node list:
# group_vars/all.yml
---
public_key: "{{ lookup('file', '~/.ssh/id_rsa.pub') }}"
default_user: ironic
cloud_config: |
  #cloud-config
  users:
  - name: {{ default_user }}
    shell: /bin/bash
    sudo: ['ALL=(ALL) NOPASSWD:ALL']
    ssh_authorized_keys:
    - '{{ public_key }}'
nodes: []
4.2.4 Deployment
So, let’s launch the playbook with the command ansible-playbook -e @config.yml deploy.yaml:

Some Considerations
Even though OpenStack Ironic was configured in a “standalone” mode, the availability of OS cloud-ready images that include cloud-init, combined with the use of Infrastructure-as-Code (IaC) and Automation systems, allows for implementing effective Hardware Lifecycle management, application layer included.
- Part Two: Getting Started with Standalone OpenStack Ironic - June 30, 2025
- Part One: Getting Started with Standalone OpenStack Ironic - June 23, 2025